FlowScape Tutorial (Part 2): How to import Models from DAZ Studio
It’s been quite a while since I posted the first part of the FS tutorial. In the previous article I explained some Blender basics and how to load custom models from external sources like Sketchfab directly into FlowScape. The awaited second part is finally here and this time I will illustrate how to convert and import figures from DAZ Studio despite their over-the-top quality and general mesh complexity. Big thanks to Mark Irissarri for requesting this recently!
DAZ Studio (registered trademark of Daz Productions Inc) is a free-to-download 3D program with an expandable library of assets and base figures you can customize however you want. While the program itself is free and comes with the main base characters, most of the content needs to be purchased from the Daz3d shop or Renderosity, unless you know how to create models and textures yourself. DAZ, however, is not an actual modeling tool; while it offers a powerful renderer and different kind of morphs/tools you can get to alter the original figures, for specific and more detailed modifications you need an external program like ZBrush or Blender.
You can check my Daz3d post featuring interesting models inspired by video games here and also keep track of the tag for more upcoming content.
So, what if you want to import a DAZ Studio character into FlowScape? The overall process is no different than the one I showed you with a Sketchfab scan, but further enhancements and texture changes are definitely required in order to optimize your models for the exporting process.
Note: Although I am providing all the basic informations, this tutorial is aimed for users who already know how to navigate DAZ Studio and Blender. Please refer to my previous FS post if you don’t know most of Blender’s shortcuts.
1. DAZ Studio Model preparation
DAZ Studio has a few base figures named Genesis (G1, G2, G3, G8, G8.1), which you can customize to create different characters. I have decided to use Genesis 8 although it is quite detailed, G8.1 is the most recent and very similar to the standard version, but it’s been improved for further realism and remade with an additional UV map. All the figures can be found under the People category and the installed morphs in the Shaping tab. The older the content is, the easier it will be for you to optimize it, be careful and very selective with what you choose.
Once the base is ready, you can start playing around with it however you please. The only thing to keep in mind is that DAZ has quite an impressive quality by default, but it also offers a way to decrease the original amount of polygons and optimize the figures for different purposes. Still, you absolutely need to avoid some specific assets, such as dForce strand-based hairstyles that differ quite a lot from a full mesh with textured cards.
By default, the figure resolution is set to High, so I would recommend to change it to Base instead. This option can be found in the Properties tab, be sure to check Genesis 8 Male/Female (or any other figure you have picked) and type ‘res’ in the search bar for an easy and quick find. Additionally, it might be best to also decrease the SubDivision, so type ‘sub’ and locate the SubDivision Level slider and change it from 1 to 0. The same process should be repeated to every single asset that you have selected.
Once this is done, you can export your finished figure in OBJ format. It is extremely important to copy all the main textures to the folder you will use in FS for the character import. If you don’t know where to find all the used maps, you can open the Surfaces tab, double click on the figure’s name and then Surfaces to expand the list, then select every single part to access its shading informations. Under Base Color you will find the diffuse texture, other maps such as Specular/Roughness and Normal might be included as well. Click on the little square preview, select Browse and you will see the right path for each texture. There also is an automatic way to export the maps with the model in the OBJ settings, although sometimes it may leave out a few important maps (especially when it comes to the avatar, only the diffuse is extracted). Also, FS does not work like DAZ, nor any standard 3D rendering program. Some additional textures have to be avoided since you won’t be able to include them in the final .mtl file.
The main textures compatible with FS are in fact the Diffuse, Specular/Roughness and Normal, but some Daz3d assets may not have all these textures included because they rely on shaders.
To export the character in OBJ go to File > Export and check that the submenu next to Save As is correct. Give it a name and hit Save, a final window will appear with the default settings that you can leave untouched. If you have Write Surfaces checked, you can leave the option on Collect. This is the automatic export for the textures that I have mentioned above.
Another thing to note is the original DAZ texture size. Most textures are 4096×4096 or even higher, if your computer is powerful enough to handle anything heavy, you most likely don’t need to alter their size. Still, I would highly suggest to reduce them to 2048×2048 at least, so that you can still keep a good quality without using too much memory.
You should also stay away from complex clothing, or anything that has a double layer/looks like it is solidified. You may spot black areas on these assets once they’re into FS, which unfortunately can hardly be fixed no matter how much you sculpt on them or recalculate the normals (or at least, I haven’t yet figured that out).
2. Blender Import and Materials
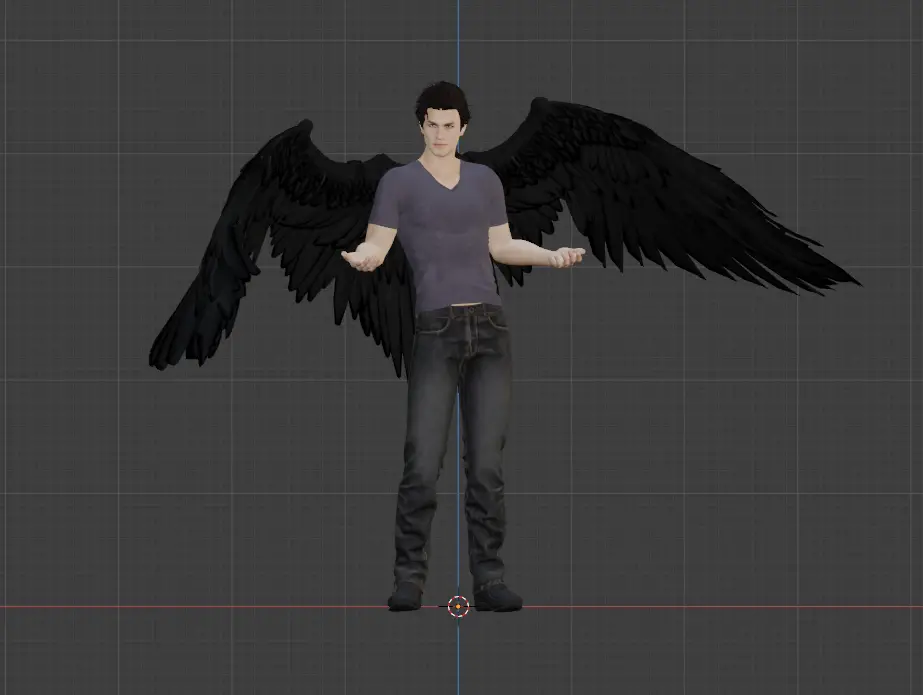
Now you can import your OBJ into Blender via File > Import > Wavefront (.obj). The overall scaling is quite huge, you can press S and drag your mouse with everything selected to reduce the size. By pressing Z > Material Preview you can check the applied textures in realtime. If you used the automatic export they will load with the model in Blender, but there are some things to do in order to make it look the way you want. It is immediatly noticeable that the eyes are fully white, Daz3d figures have a specific setup for them that also includes additional parts for the eyemosture and cornea. The transparent areas will show up with a black geometry around them too, but for the time being you can just keep them this way; FS doesn’t read separate alpha textures, so you need to create a new PNG image for all the transparent parts and replace the original diffuse with it. In Blender, you normally add in a Mix Shader with the transparency node to activate the alpha stored on diffuses, then set the Blending mode to Alpha Hashed. But, unless you simply want to preview your model correctly in the program, you won’t really need it for the export.
Let’s start by right-clicking on the eyelashes to select them, open the Material Properties tab on the right and also the Shader Editor at the bottom. The eyelashes are light brown and there only is the alpha texture connected to the Principled Shader. Eyelashes only seem to use solid colors and do not offer any diffuse texture, so you’ll need to work on this as well.
The second thing to take care of is the eyemosture/tear line that is part of the lashes, you can see its material slot appears right after the main one. At this point you have two options; create a simple alpha map to apply to the area, or you can delete it. This part is generally rendered with a glass/water-y effect and doesn’t require a diffuse nor opacity texture (although they are created for Video Game characters most of the time nowadays). I don’t think that FS will display it as intended, for the sake of this tutorial I will remove it and only keep the eyelashes with one material. To delete the parts you don’t want from a mesh, you can enter Edit Mode by pressing Tab > P > (Separate) by Material, this will help me split the eyemosture from the lashes and allow you to easily select it and remove it from the scene.
The same now has to be done with the eyeballs, since they also come with an additional mesh for the eyemosture. Each surface on the Genesis model is merged into the same figure, so you can either separate by Material again, or find the proper slot and click on Select (in Edit Mode) to only highlight the area you want to delete (just remember to also click on the down arrow and remove the unused materials when you return to Object Mode, this will clear things up).
The Cornea in DAZ is used to apply an additional transparent texture for the eye reflection, or an overall realistic glassy effect. It can stay or it can go.
To create e new diffuse+alpha map, open your editing program of choice and import both textures. In Photoshop you can copy the opacity map and generate a new Alpha channel to paste it:
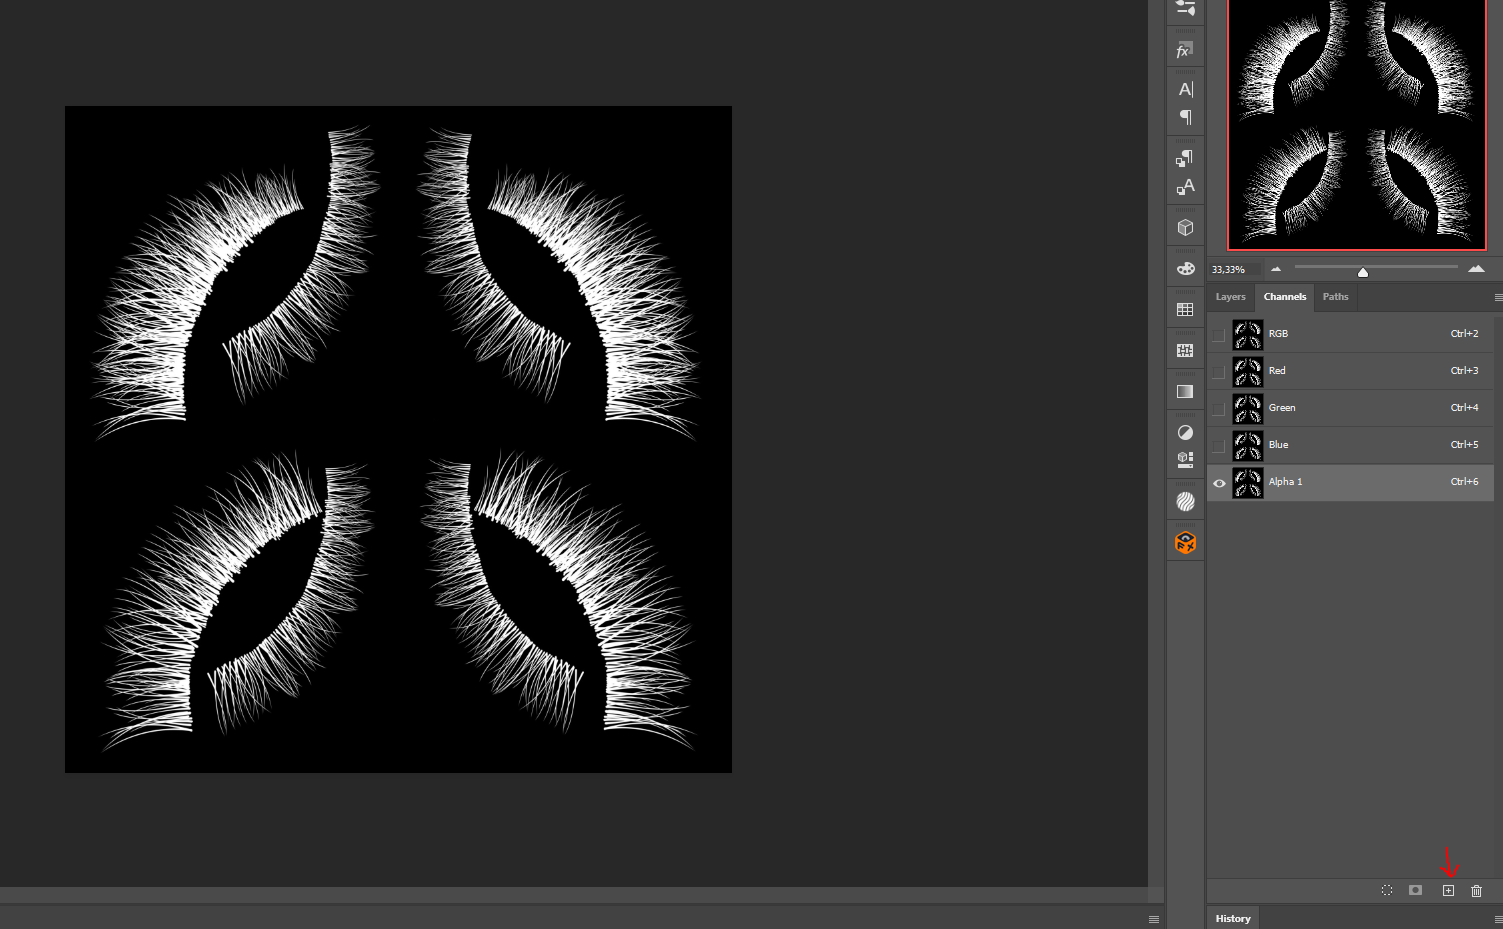
Press CTRL+Left click on the Alpha 1 to select the part you need to keep, then select the RGB one, go back to Layers and use the CTRL+J shortcut to duplicate the selection without the black background. Delete the original layer (you won’t need it anymore) and make the eyelashes black via Image > Adjustments > Levels, then move the slider to the solid black color. Save the image as PNG and the transparency will be preserved, connect it to the Principled Shader in Blender and FS will immediatly recognize it as an alpha texture. The same applies to any other texture with transparency, except you don’t need to change the color on those.
Once all the transparent parts are corrected with the same process, you can move to the other additional textures and increase the final quality. Like I stated earlier, some models do not provide Specular/Roughness and/or Normal textures and this could result in a very flat model in FS. While you can fake and control the shiness directly with Blender and the .mtl file, the Normals are absolutely vital because they store most of the high quality detail for that beautiful realism we see in the 3D world the entire time. DAZ Studio mainly uses Displacement maps instead of Normals in most cases and they cannot be used for this purpose. For the characters and their skin, you can actually retrieve some useful Normals from other existing texture paths. Michael 8 and Victoria 8 are the most iconic figures available for the Genesis avatar and they also include Normal maps in their setup. If you don’t own those characters and prefer to use a different method, you could try creating new textures yourself with Materialize for free or even NormalMapOnline (also free).
For the clothes, accessories and any other asset without a Normal, you can still use one of those free methods, or try the NM Generator in Photoshop (Filter > 3D > Generate Normal Map). In other words, you have a bunch of cool options to try!
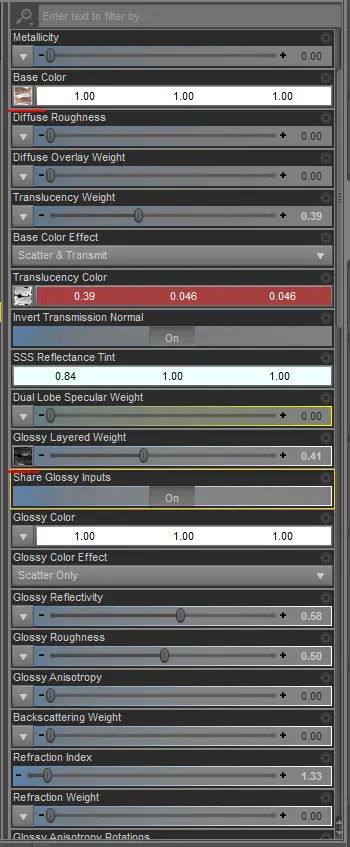
The diffuse has to be attached to Base Color in the Principled BSDF, the specularity is controlled with the Specular and Roughness sliders (when the Roughness is on 0 the surface appears wet, when it’s on 1 it looks completely smooth and without any shine. I would start having it set to something like 0.8, while keeping the Specularity on 0.05. These values can be modified in the .mtl file accordingly if the effect does not look right in FS). Of course, if you have a specific map for that, you can apply it. For the Normals you need to add the Normal Map node with Shift+A (type ‘Normal’ in the search field), attach it to the Normal point and then connect the needed texture to it (remember to set the Color Space to Non-Color). It would also be recommended to have only one material for the parts sharing the same texture, as the less slots you have the easier it will be for you to handle the exported file. Just enter Edit Mode, click on each connected material (for example the Face, Lips and Ears) and use the Select button on all of them to highlight the shared areas, then Assign to just have one. After that, remove the unused slots manually or with the down arrow.
3. Decimation and Export
Once you are done with the basic maps, values and settings, you need to reduce the original quality. Although we have already changed the resolution in DAZ Studio, some things like the hair and clothes may still be too intensive. In the Modifier Properties on the right locate the Decimate option, under Collapse bring the value down to 0.5. You can go even lower as long as the mesh stays intact, it’s quite easy to determine when our assets reach their limit. If even 0.5 is too much and the mesh breaks/gets distorted UVs, input a higher number.
With everything set, you can try exporting the model and edit the .mtl. Go to File > Export > Wavefront (.obj), leave the settings as they are and save. The .mtl will appear in your model folder next to the OBJ, you can open it with any text editor such as Notepad. This part is the most important in the workflow and it is required to tell FS how to load the model and the way it should display its materials.
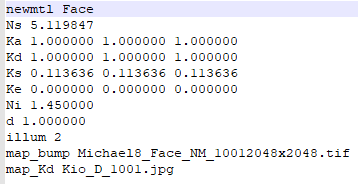
In this example here you can see how one of the mats in my export looks. Map_Kd represents the diffuse/base color map, map_bump is for the normal. The only functional values are Ns for the shine/specularity, Ks to control the Roughness and Kd to increase the brighness of a map and give it a full glow if needed (or even alter the RGB tones). If you have a Roughness map you want to use, add a new line with map_Ks RoughnessTexName.jpg.
Important: Do NOT leave the ‘b’ in ‘bump’ as you see it with the uppercase letter when it stores in the .mtl from Blender! For some reason map_Bump deactivates the normal texture and it only works if it is written in lowercase. Also, be sure that your textures have no space in their name, otherwise the model will not be displayed correctly. The same problem can occur if the textures are not in the same folder, but into a separate path.
4. FlowScape testing
Now it’s time to test the waters in FS and load your model. Go to the house icon on top, click on Import and then Mesh in the small window that appears at the bottom. Search for your OBJ and wait for it to load, it may require a few seconds and you should also probably adjust the scale with the gizmo arrows.
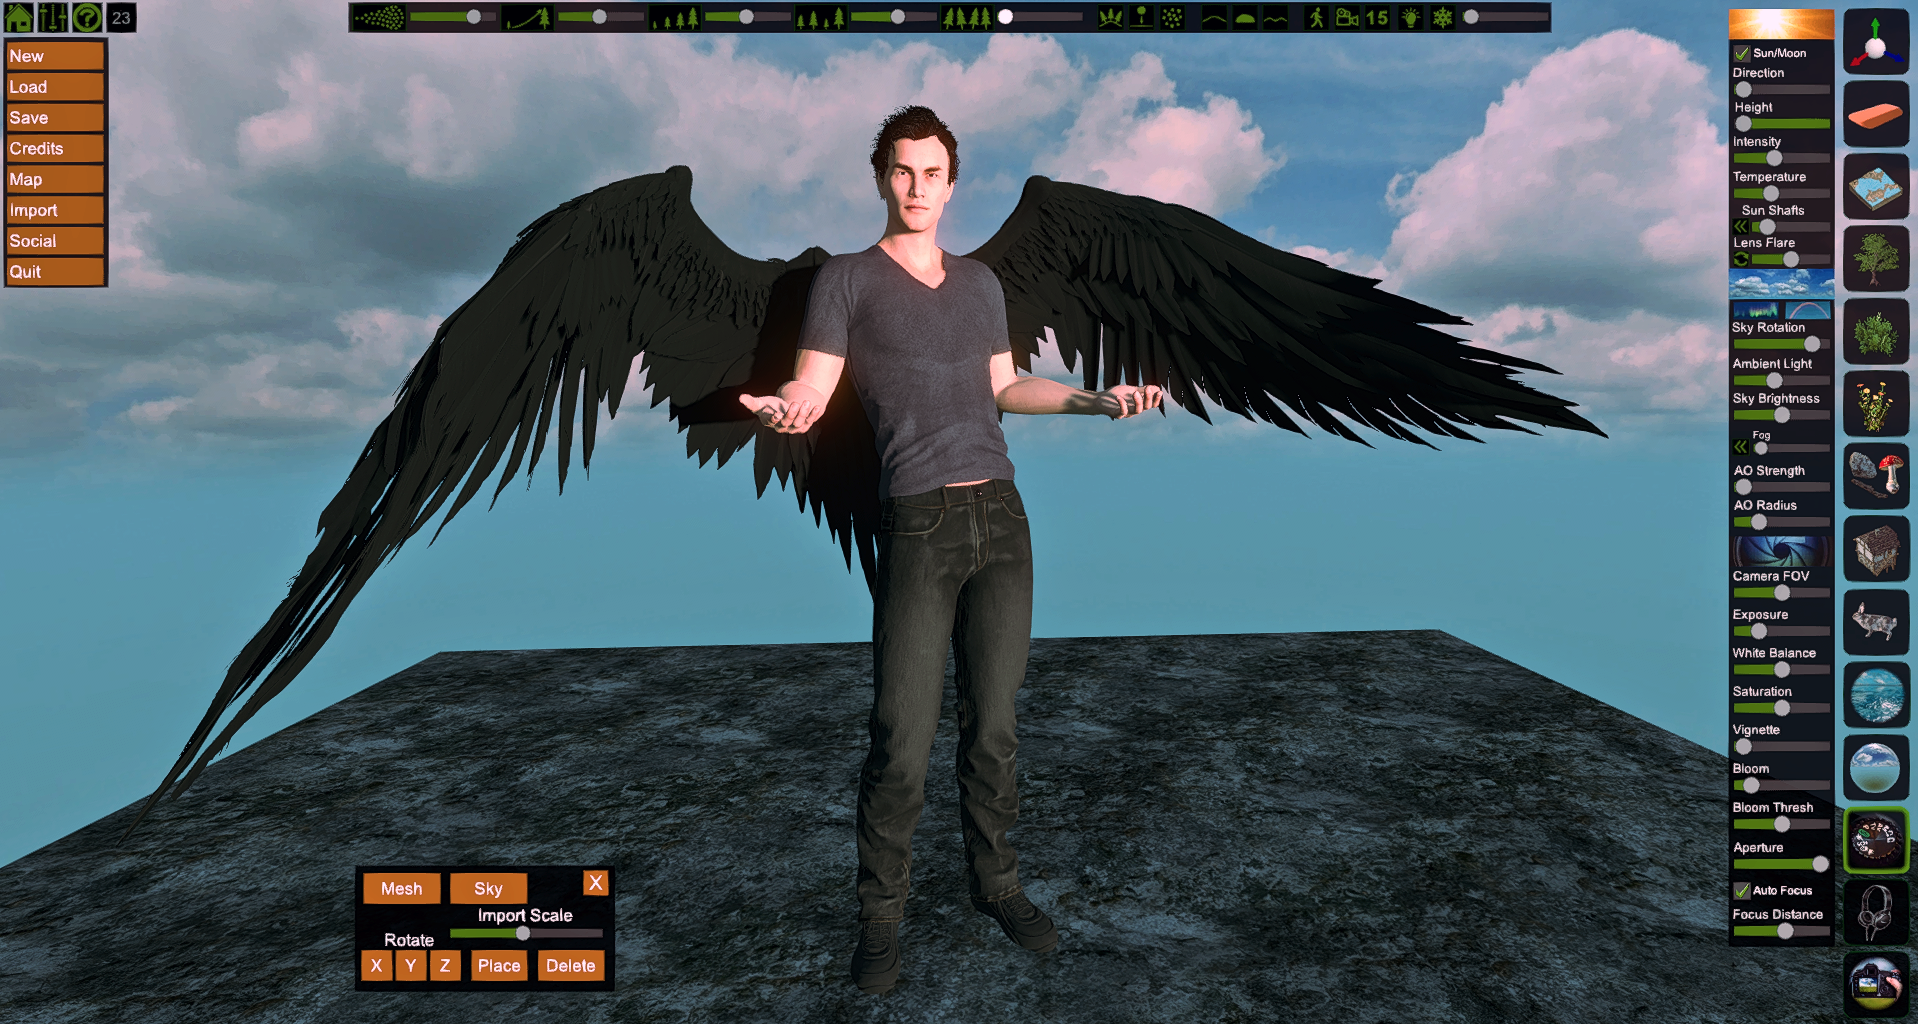
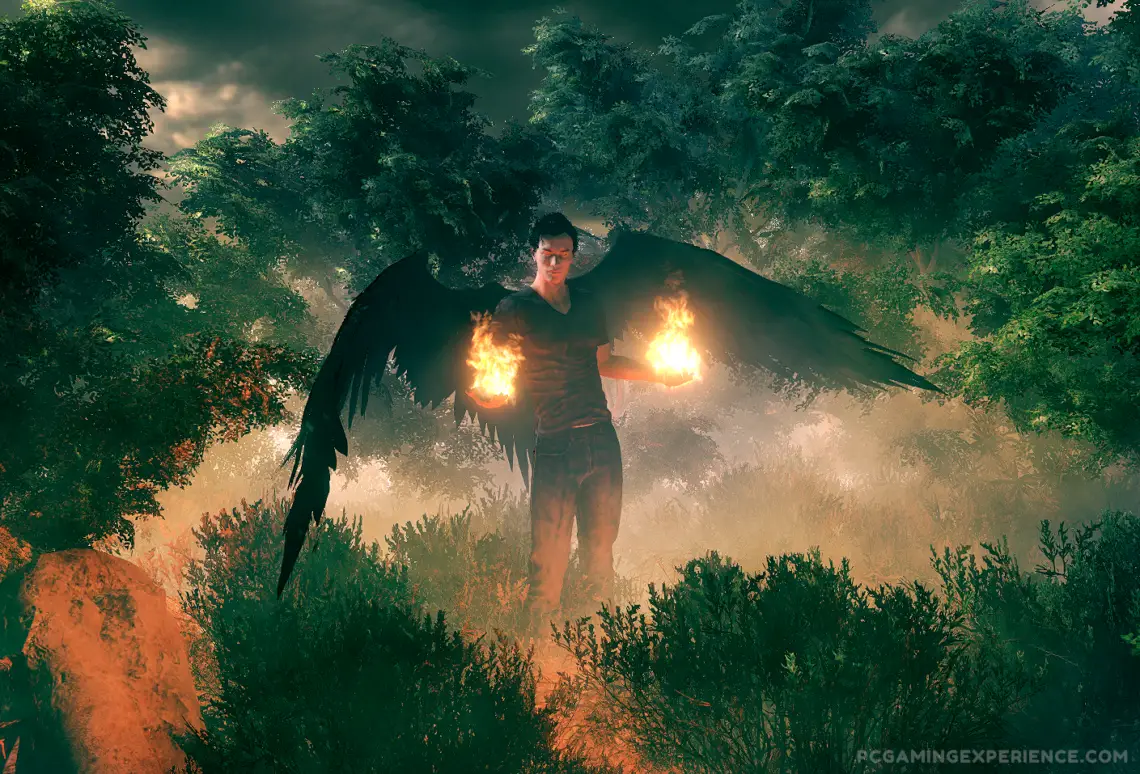
If you are lucky, everything will show up as intended and you don’t need to go back and forth too much to edit the .mtl and reload each time. Some alpha textures/surfaces could load with an evident backface issue where they appear half invisible once you turn the model around and this can affect the ground shadow too. In my case here, the wings look partially missing when I stare at this guy from behind. You can probably solve it by entering Edit Mode again in Blender, going to Mesh > Normals > Recalculate Inside (or Outside, depending on the direction they are facing and how you need them to look), although this doesn’t seem to be always effective. Alternatively you could try to duplicate the mesh and push it back a little bit, then recalculate normals and have two different directions while using both meshes.
Whenever you export the file anew, you have to edit the .mtl all over again as the map_bump will revert.
5. Conclusion
FlowScape was originally created for environments and not aimed for detailed characters. While you can basically import any custom model, the final looks will differ and some additional editing + painting might be necessary on the saved image, it’s mainly a matter of experimentation and creativity. Overall, without any doubt, this can be an incredibly fun pastime as you can create anything you want. Some Daz3d models, especially the older ones, are easier to handle than the most recent content.
If you have any question, feel free to leave a comment below. Enjoy!

