
FlowScape Tutorial (Part 1): How to import custom Models from Sketchfab with Blender3D
In my previous FlowScape article I briefly talked about the possibility of loading custom 3D models into the level editor. Today I’m offering you a complete tutorial which will explain in detail how to import additional content into FlowScape, specifically from Sketchfab using Blender.
Warning: Long and technical documentation ahead!
If you are into level design and already know about FlowScape, chances are you may want to use different 3D models in addition to what the tool already offers. For example, we got a bunch of nature elements such as trees, grass, water, rocks and flowers, along with many useful items like fantasy themed furnishing or platforms. FlowScape even has animated dragons, creatures and animals, but there is a total lack of humanoid characters and urbanistic elements for modern scenes like cities.
This is exactly what the Import option is made for; it allows you to load any properly converted model for your needs in order to expand your imagination and create an infinite number of unique environments.
If you cannot model 3D characters or objects from scratch, you can start off downloading useful royalty-free models from Sketchfab. You need to create an account to use the site, but you can find a lot of free models offered to you by incredibly talented 3D creators and store them into collections for an easy find.
Depending on the type of scene you want to create, I highly recomment to search for human scans first.

Simply type what you’re looking for in the search bar and be sure to check Downloadable to only load free content (unless of course you feel like buying other high quality models you truly like and support the modelers). A good example of nice character scan is this 3D Scan Man 1 file by rusttm88.
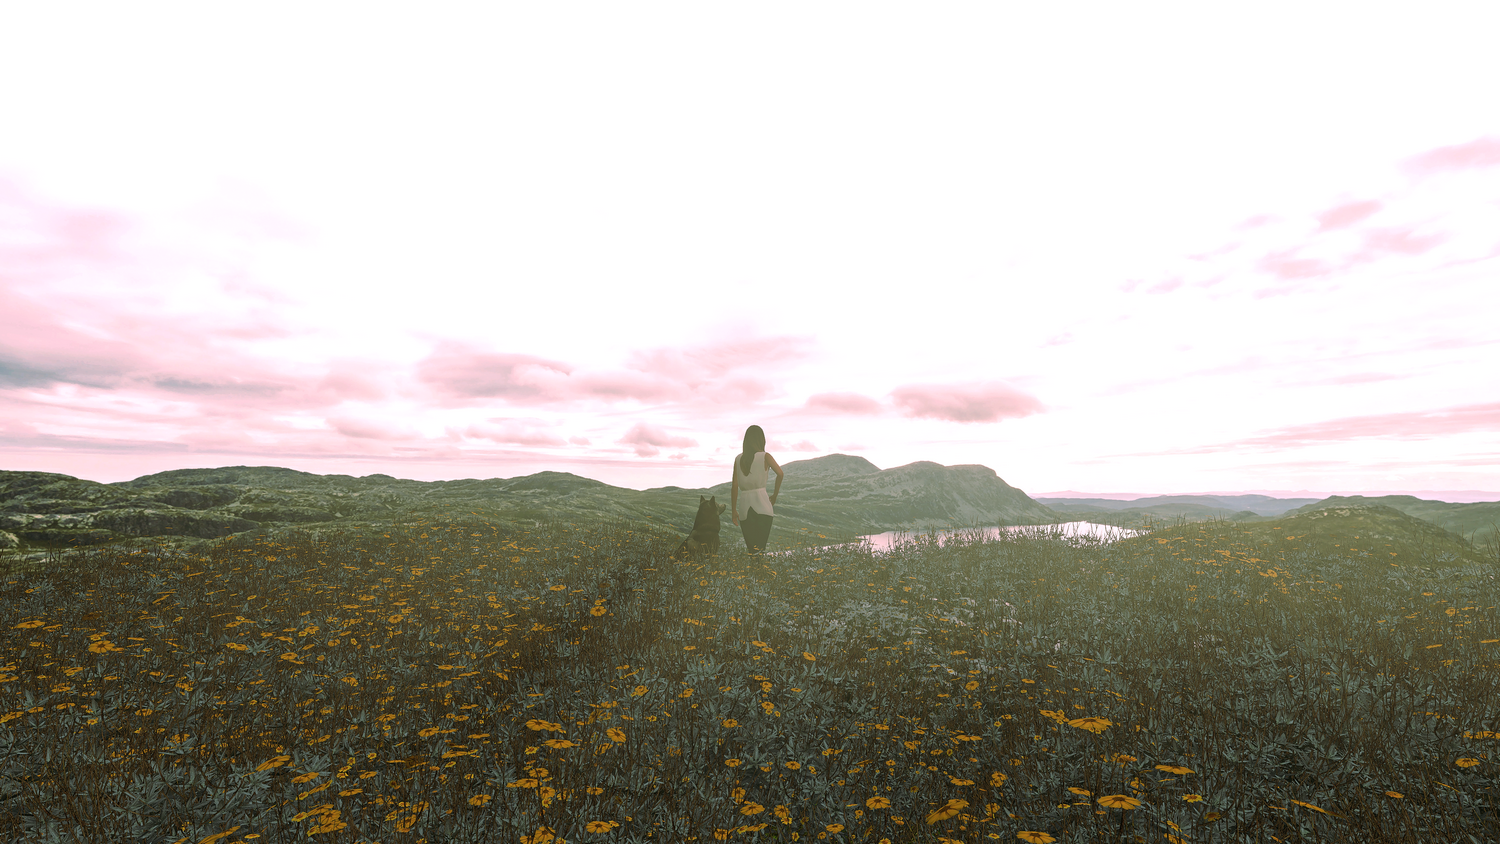
Here you are an example of female and dog scans put into use:
Once you have a model you would like to import, you cannot load it into FlowScape as it is from the menu. Chances are it will load fine, but appear completely white or with random red spots all over the surface. This may happen when the materials aren’t properly applied, reason why you need to do some work before using any custom assets in its raw stage.
First of all you have to check the file format; as long as it is labeled as .obj, .fbx, or .dae you can easily open it and attach the needed textures, eventually modifying its topology too should it prove to be too heavy for the tool or system itself.
But one step at a time!
You can do the conversion process in any 3D program of choice. If you never used any sort of 3D application before, then you may want to choose Blender above anything else; the program is open source and thus completely free to use with no restrictions nor trial evaluation.
For this tutorial I’m going to use the Aaron scan by bisp.
1. Model adaptation
Install Blender and open it from the generated Desktop icon, the current version is 2.82. You may feel a bit intimidated at first upon seeing the interface… don’t worry, it’s completely normal and you will get used to it pretty easily the more you play around with it!
With Blender fully loaded press 1 on your Numpad to switch to the front view, then the A key to select everything (cube, camera, light point). Remove it all with the Delete key, you don’t really need those elements for this purpose now. On the contrary, they may just get in the way. The deselect command is Alt + A!
Unpack the model you downloaded from Sketchfab and open it via File > Import > Wavefront (.obj), then locate the correct directory and double-click on your desired file.
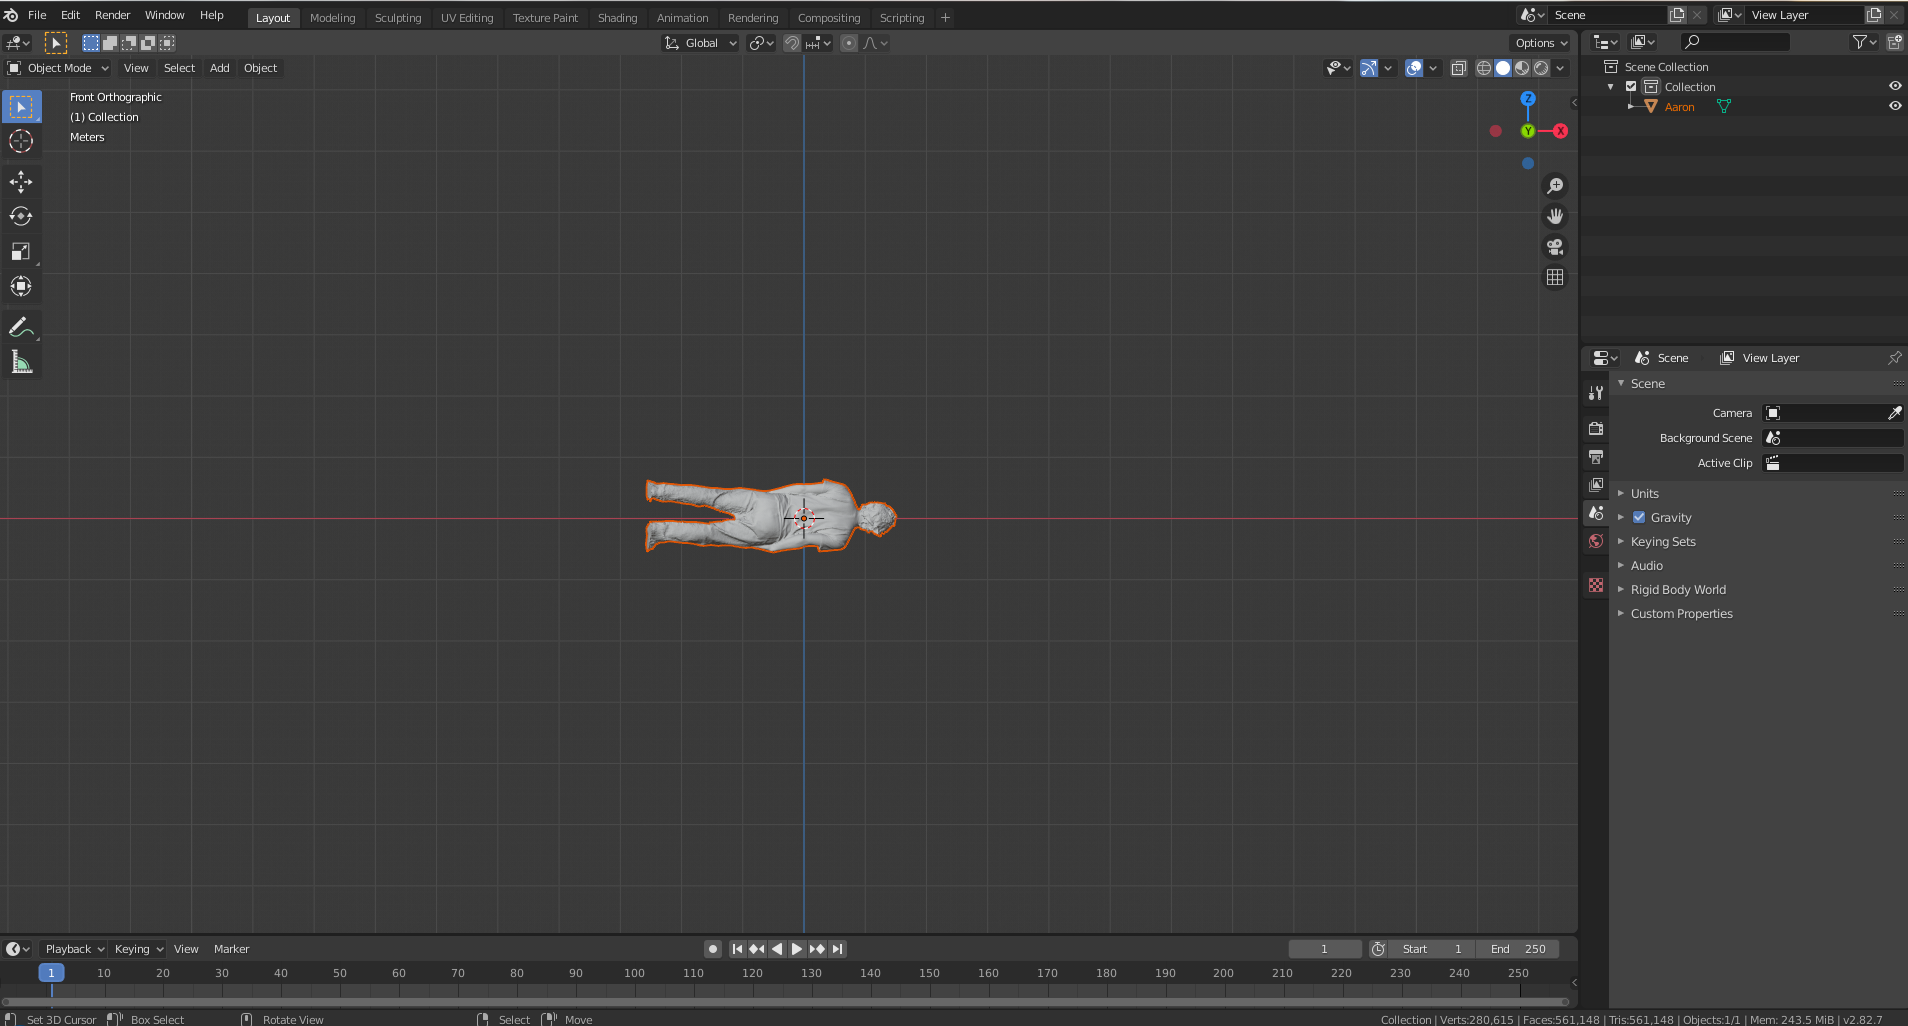
Sometimes the model may load with a wrong orientation and that must be corrected. Right-click on the loaded mesh to confirm your selection and use the R key to activate the rotation feature, then type -90 from the Numpad in order to bring the character into a vertical position, press Enter to validate it.
From the selection on the left, pick the Move tool (the four arrows icon, third button) and drag the model up/down so that the feet will meet the red line perfectly. You want it to be at the center of the scene, with the middle button of your mouse you can rotate the viewport for a full exploration and check where the model is actually standing. Use the 3D cursor point as reference for the re-positioning if it’s not centered as it should be. If the model is still not facing you, rotate it once again with R > Z > type 180. In alternative you can just pick the rotation tool on the left and do it all manually.
You can zoom in and out with the mouse wheel, – and + from your Numpad, or using the little magnifying glass icon on the right.
If the model is too big or too small, you can scale it with the S key and mouse drag.
Before doing anything else I would open the Object menu on top and select Shade Smooth. This will automatically remove any squary/sharp angle from the model, resulting in a bad-looking figure once imported.
Now that the position and orientation are fixed, we need to be sure its overall quality is not going to take too many resources. To see how the polycount looks we can enter the Edit Mode pressing the Tab key with the mesh still selected. Human scans are usually particularly heavy, if it takes some time to display all the faces highlighted in orange, you can already tell the model you loaded is going to be particularly demanding.
FlowScape can surely import many complex models, but it all depends on your computer and its general capacity (RAM, GPU, etc). If you do not own an advanced system with the most recent hardware, I heavily suggest to decimate these models in advance.
As you can see from this preview, the Aaron scan is showing a pretty high polycount. This may or may not be problematic later, so I prefer to stay on the safe side and decimate it to be sure it won’t cause me any problems.
To do so, switch to the Modifiers tab on the right (screwdriver icon) and under Add Modifier select Decimate, this will load a short menu with a couple settings. You will immediatly notice the Collapse option with a blue bar marked as Ratio and 1.000 value. Decrease it to something around 0.5.
If the model starts breaking in different areas, it means you have to keep the general polycount higher than how you set it to still preserve its details. The higher a polycount is, the more you’ll have to collapse your model eventually adding in a Decimate modifer anew if you already went too low with the value and can’t edit it further. Click on Apply and enter Edit Mode again to see what happens. If the polygons load faster and they appear to be bigger leaving much more space than before, it means the model as it is now will most likely work fine. If you accidentally applied the modifier and most of the quality appears to be lost, you can undo your every last operation with CTRL + Z.
This step is quite experimental and depends on how FlowScape and your computer behave. If you feel unsure about the polycount, try importing the model as you have it (following the rest of the instructions here) to see if it opens properly. If it slows down too much you can always get back and reduce the quality even more.
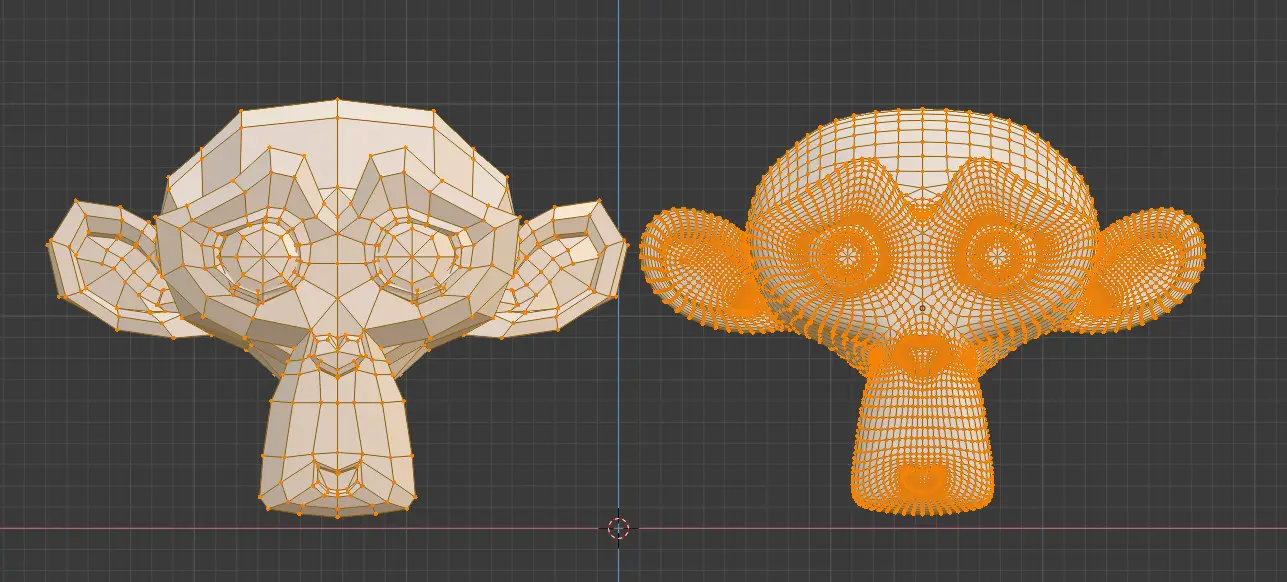
Vice versa, if you think your model’s quality looks too low for comfort you can improve it by adding a Subdivision Surface (modifiers tab again) with the value set on 2 and the Optinal Display option checked. For reference, here’s an example of low polycount on the left and a high-poly mesh on the right. Setting them to Edit Mode you can see how many vertices the HD model has. The more vertices = more polygons, more polygons = better quality.
Important: It is usually recommended to always remove doubles from your models in Edit Mode. With all the vertices still highlighted (A key to select all, Alt + A to deselect as usual) go to Mesh on top > Clean Up > Merge by Distance. If the model has any double vertices, you’ll see how many Blender removed in a message below. If not, the program will tell you it found 0 vertices in total, that is to be expected as well if the mesh is already optimized.
2. Materials
Now we can start working on the materials. This part is very crucial and needs to be done right, or the model will load without textures as previously mentioned. Start off by using the Z key to access the display settings and select Material Preview (it was called LookDev until 2.81) to display the texture(s) once applied to the model.
Scanned people may have a 4k or even 8k diffuse texture. Once again, depending on your system’s capacity you may import the map with its original size without issues, but you should probably reduce its resolution to 2k (2048px) to keep things light. You can do that easily with any editing program like Photoshop or Gimp.
To apply the materials you have to open the proper editor, which is most likely hidden at the moment. If it is, move the mouse cursor on the lower bar (the line right above the Object mode, View, Select, etc) and when a double arrow appears on the edge just drag it up to unhide the lower panel. Click on the Editor type drop-down menu on the top left (should be the Timeline clock icon by default) and select Shader Editor.
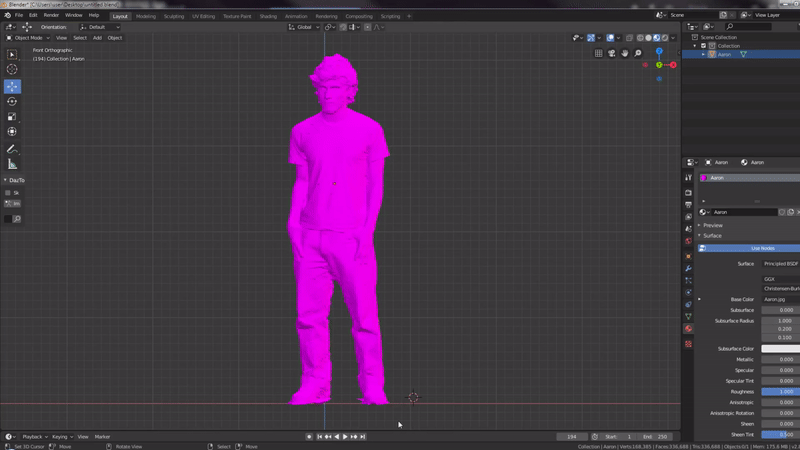
In theory, every model you import loads with a standard shading set even if the texture itself cannot be found (reason why the model is pink). However, if all you get is an empty Shader Editor, you need to create a new material by clicking on the sphere icon on the right (the one you see selected in the gif above) and press the + next to it and the New button.
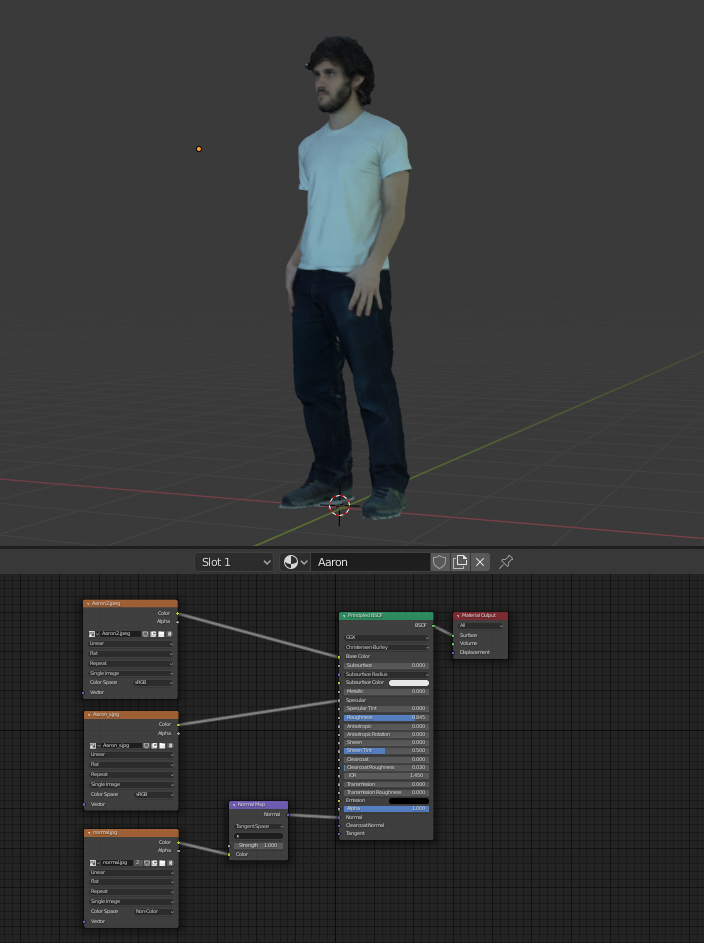
Blender 2.8+ is configured to be used with the Principled Shader, which includes different properties at once that you can modify easily instead of using different nodes. Click on the little folder icon in the very first box connected to Base Color and load the texture you need from the correct location. With the Material Preview mode active you can see it taking action in real-time.
If you had to create a new material you probably don’t have any texture box connected. Press Shift + A into the Editor and go to Texture > Image Texture, left-click to place it. Click on the little dot next to Color and connect the line to Base Color in the Principled shader. Select the Open button to find the map and load it.

You have to tweak some settings to prevent your model from being overly shiny. Be sure to decrease the Specular value to 0 or close to it and bring the Roughness up to the maximum, you can always modify it manually in Notepad++ (or similar editor) typing a different number next to Ns, but I will get to this part in the next step.
People scans do not always include additional textures on Sketchfab, so at this point you are technically already done with the material part. Still, chances are you may also have a Normal Map in the folder, appearing like a blue map with strong edges outlining every UV selection. This texture is vital in video games and 3D rendering because it stores a lot of details like skin pores and folds for fabrics, reason why you shouldn’t ignore it if the creator included it.
Add a new Texture box with Shift + A like before and use it to open the blue map, but don’t attach it to the Normal node yet. Instead, Open the Shift+A menu again and type Normal in the search field, pick the Normal Map shader and place it into the editor. At this point you have to connect that one to the Normal input from the Principled and attach the previously loaded texture to Color from the Normal Map shader.
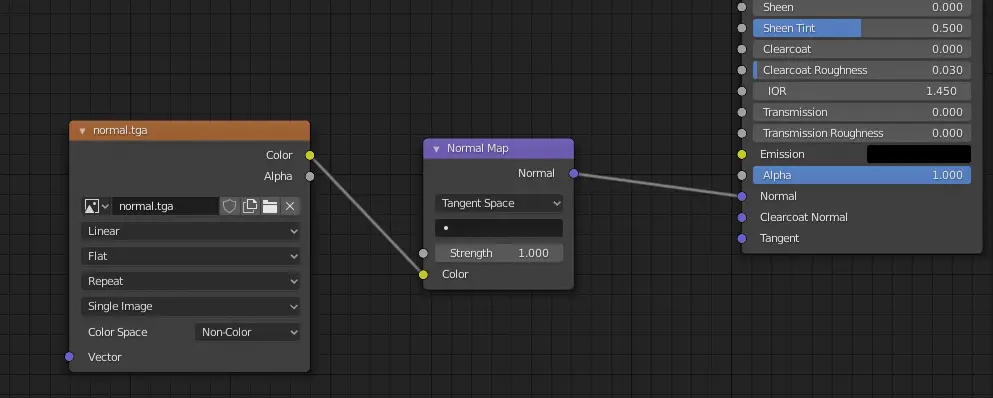
Set the Color Space to NonColor so that it can grab the right informations from the texture, you should immediatly notice the difference in the viewport (might be subtle, depending on the texture quality).
Another particularly important texture, not always included with these scans either, is the Specular Map created to determined the areas that require a specific amount of shine and the ones supposed to be darker. If you see a black and white texture along with the color diffuse and normal map, it means you can also put the Specular settings to a good use.
The Principled shader has two ways of controlling the shine amount; Specular and Roughness as stated before. You need to create a new texture box as we did for the other two maps and connect it to Specular, then use the Roughness value to control it.
3. Export and text editing
Now you are set to finally export the model. Go to File > Export > Wavefront (.Obj) and overwrite the original model or give it a new name. IMPORTANT!! It has to be saved into the same folder where its textures are located, otherwise FlowScape won’t be able to pick them!
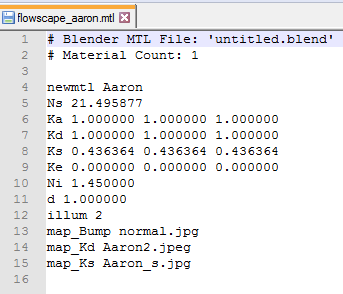
Wait for the program to complete the saving process and switch to the model’s directory. You will notice that with the Obj file you also have a second element with the .mtl extension, this is automatically generated whenever you export in Obj format and it stores all the material(s) informations.
Before testing the figure into FlowScape you have to check the .mtl with a text editor like Notepad++ to see if everything worked as intended. Also remember to save the Blender scene (File > Save As) in case you need to fix things later.
Ns is the Specular value, set to 21.49 in my case. It may still be a bit too shiny, so I will bring it down to 10 or even 5.
Kd stands for diffuse/base color and it can be used as an emissive/glowing material as well with the value set around 2 or higher.
All settings seem to be okay so far except for the normal map. Blender exports it as map_Bump, but for some reason FlowScape fails to load the texture if it isn’t all written in lower case. Change Bump to bump, as odd as it may sound this is the only way to make it work.
Being a single mesh we only got one material set. If you’re reading this article I assume you already know how to use FlowScape in the first place, so all we need at this point is an empty flat land. Click on the House icon on the top left, select Import from the menu and Mesh in the new window that shows up.
The application will prompt you to select the OBJ model you want to use from your computer, double-click on it and wait for the figure to be loaded into the scene.
The loading time can vary depending on the quality of your model. In this case the Aaron scan only took a few seconds and with the current .mtl configuration it is practically ready to be used with no further changes material-wise.
4. Troubleshooting
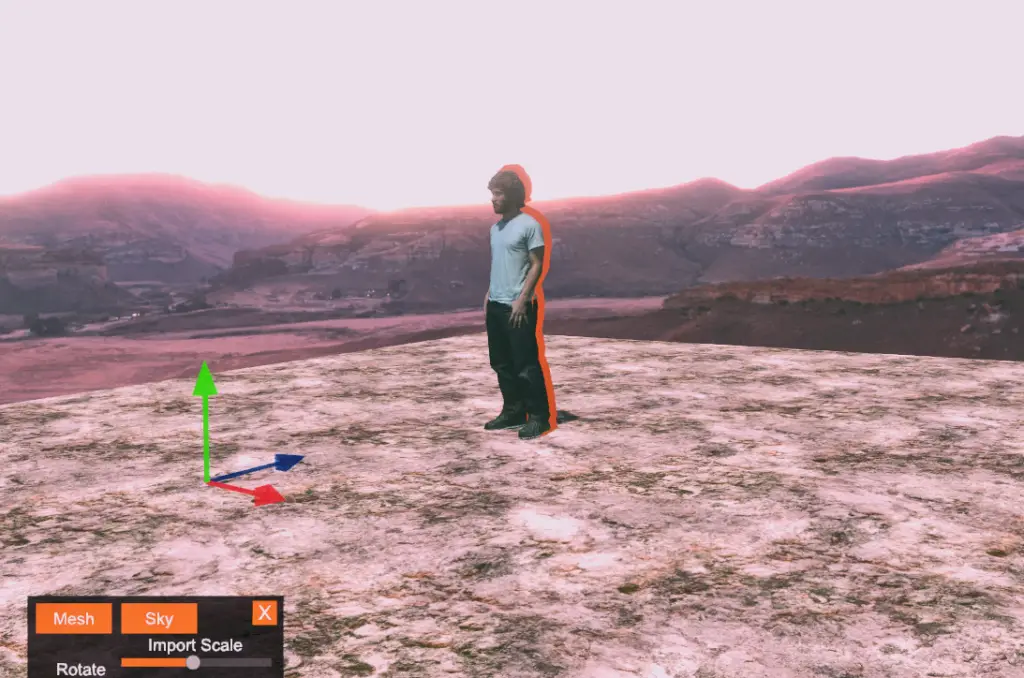
While our model looks fine at a first glance, we have encountered a little problem over here: the directional arrows and rotation coordinates are not aligned with it, most likely because it was originally decentralized and we had to manually place it in Blender. The model can still be moved and rotated around the scene, so if you aren’t particularly picky you may keep it this way for the sake of one picture. I prefer to have all the Gizmos in line with the characters for a more accurate positioning though, so let’s see how to fix this minor inconvenience.
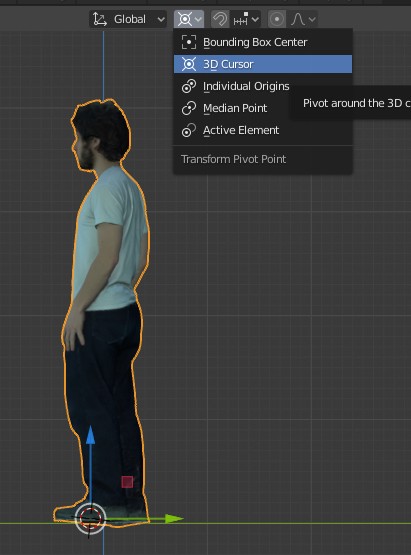
Open Blender again and press the 3 key on the Numpad to switch the view to the side, here you can see the directional arrows are indeed out of place and generating an uncomfortable movement. We can easily fix it by clicking on the Transform Pivot Point icon next to Global orientation and setting it to 3D cursor instead.
The coordinates will reset to the center and all we have to do now is export the model again to see the modifications in action. Remember to also update the .mtl document before using it. Let’s import the model into FlowScape a second time, you will notice that everything is now fully centered and aligned as intended.
Another issue you can have every now and then is related to the textures not loading despite the Blender work. This can happen when a map isn’t applied correctly, or for some reason it didn’t store into the .mtl file. Sometimes the texture name can also include spaces between words and FlowScape doesn’t like it at all. If that’s the case, rename the texture as you like but do not include any empty space (underscore seems to be fine), also replace the original name(s) in Notepad to validate the change.
If the texture is missing from the model and the map’s name is okay, add in the Kd line manually under illumin 2, so it will be like map_Kd diffusetexture.png.
If you have any question related to Blender and/or FlowScape itself feel free to leave a comment below. Stay tuned for the second part of the tutorial; I will explain how to do the same thing with DAZ Studio models, since they are much more complex and use different parts.
Happy creating!


amzn_assoc_placement = “adunit0”;
amzn_assoc_search_bar = “false”;
amzn_assoc_tracking_id = “pcgamexp-20”;
amzn_assoc_ad_mode = “manual”;
amzn_assoc_ad_type = “smart”;
amzn_assoc_marketplace = “amazon”;
amzn_assoc_region = “US”;
amzn_assoc_title = “My Amazon Picks”;
amzn_assoc_linkid = “4ea679dfffe8c41887e4fe82e8787a28”;
amzn_assoc_asins = “B07D1WWBL3,B083GGYNQ6,B075KMZ4MX,B07YLGH9Q5”;