ReShade Tutorial: Graphics Enhancement
In a previous article I explained what ReShade does and how to activate it. Now, since I’ve got a few questions and appreciations regarding the custom presets I use in all my screenshots, I’m offering you a detailed tutorial about this feature and its main functions. If your machine can support it, you can use a specific configuration for some graphics enhancement and even go beyond the already outstanding vanilla effects.
!!UPDATE!!
The official ReShade 3.0 has been released publicly and the old builds are no longer downloadable on the site. Still, you can find version 2 and all the previous SweetFX installers in the Repository here. If you are a new user, ReShade 3.0 has a different setup and I need to test it for a bit to see what changed. I will definitely post a new guide for that as well.
!!UPDATE 04/08/2017!!
The guide for ReShade 3.0 is finally available!
First things first, be sure you know which version of the game you are running. This is very important because you have to copy some .dll files in your main folder and ReShade lets you choose between a 32 or 64 bit component.
ReShade is currently updated to the 2.03 version, although the official v3 is already in a beta phase on the forums. The installation, as already explained in my other post, is quite easy but still a bit tricky depending on the game you want to mod and how you copy or modify the provided files. You can download the needed stuff from the official site here, then extract everything from the archive to a folder of your choice in order to have the starter configuration at hand whenever you want to improve a new game.
You can use the ReShade Assistant or simply copy the ReShade folder, ReShade32/64.dll and ReShade.fx in your game directory. The manual installation is way better in my opinion, especially considering the Assistant can be a bit confusing if you don’t really know where to start nor how it works.
Before loading your game and play around with the presets, be sure you have renamed ReShade32/64.dll in dxgi.dll. Since we are talking about a custom configuration we’re literally starting from scratch here, thus you won’t see any difference when the game is open.
If everything is done correctly, you should see a confirmation text appearing on the top. In case you see a yellow line mentioning an error or something like that, ignore it! It’s not really related to a malfunction and you can still modify your files the way you like.
Open the ReShade folder and go to Presets > Default. There you can find ten files with the .cfg extension, which you can open with Notepad. Pipeline is a simple list with all the available shaders in a specific order and they can be modified according to your needs and how you want the game to look.
Some of the presets are actually useless to me, so I will simply write down a list of what I use and what my shaders of choice do.
Shaders_by_CeeJay
SMAA: Very useful if you want to get rid of all those jagged edges in your image. Sometimes, even if you have the in-game antialiasing activated, you could still get a disappointing quality with undefined edges. With this shader you can force it even more for a smoother and more detailed result.
FXAA: This kinda works like the SMAA, but you can leave it off if you have already turned the latter on. For some more clarification about in-game graphics and antialiasing you can check this post.
LUMASHARPEN: I don’t always use this one because it depends on the game and how the overall quality is. It basically sharpens the image making it more defined, but in some cases it may appear a bit too strong and create some bad edges all over again.
LEVELS: It seems to work like any editing program such as Gimp or Photoshop. You can increase the lighting and contrast for a better image.
TECHNICOLOR: Modifies the original tones of the game. There are a few values you can play around with in order to get more reds, greens or blues.
TECHNICOLOR2: It works just like the standard Technicolor shader, adding some more coloring and saturation to it.
TONEMAP: Another modification for gamma, exposure, etc.
VIBRANCE: It saturates the image in a very intelligent way, without overdoing it. You can also desaturate if you set a negative value (for a ‘Black & White’ effect you can directly use the MONOCHROME shader).
CURVES: Another adjustment layer for contrasts.
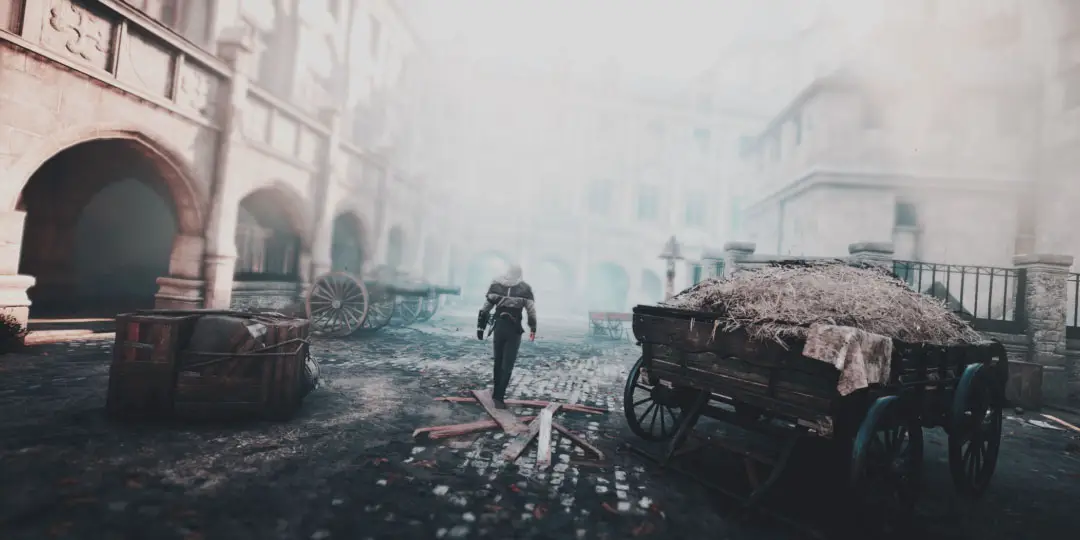
FILMICPASS: This is actually one of my favorites. It creates a sort of cinematic look and you can, once again, modify the values to expose one color more than the other two (RGB = Red, Green, Blue). If you think the image is getting too dark, simply decrease the strength from 0.85 to 0.65 or so.
An example of color enhancement:

FILMGRAIN: I am not a fan of the classic noise you get in some cutscenes, but in case you like the cinematic feeling you can try it out.
VIGNETTE: Again I don’t always use this, but it’s very useful if you like darker edges in your image. You can also make it bigger or smaller and eventually change the color from black to white.
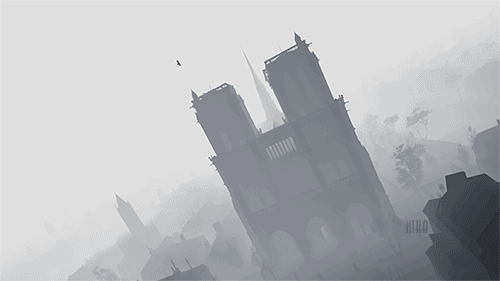
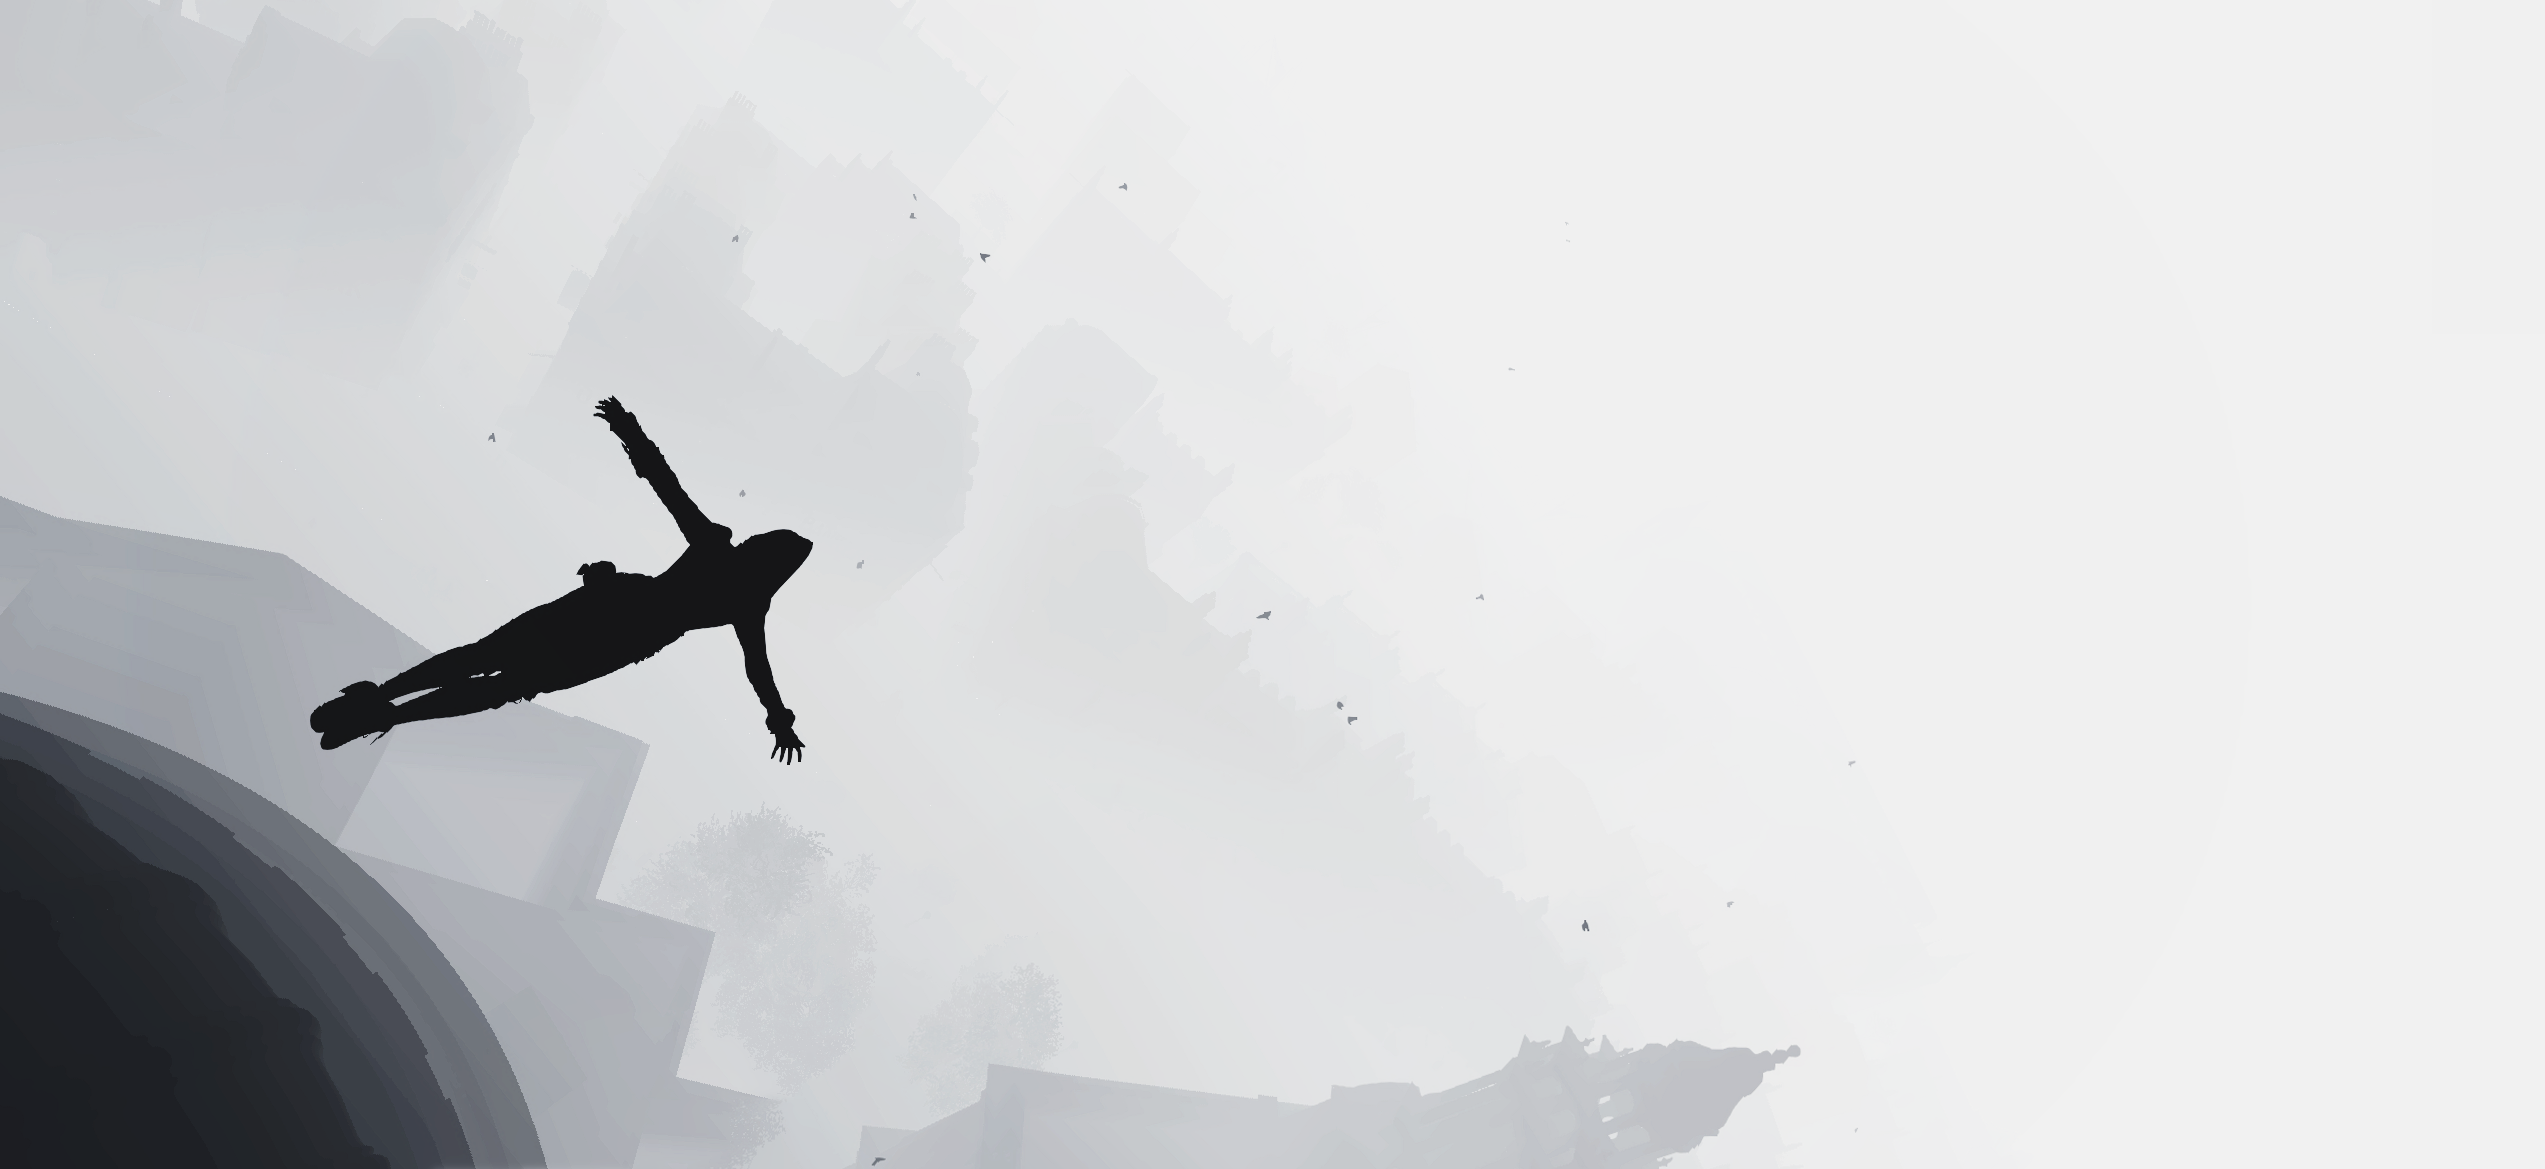
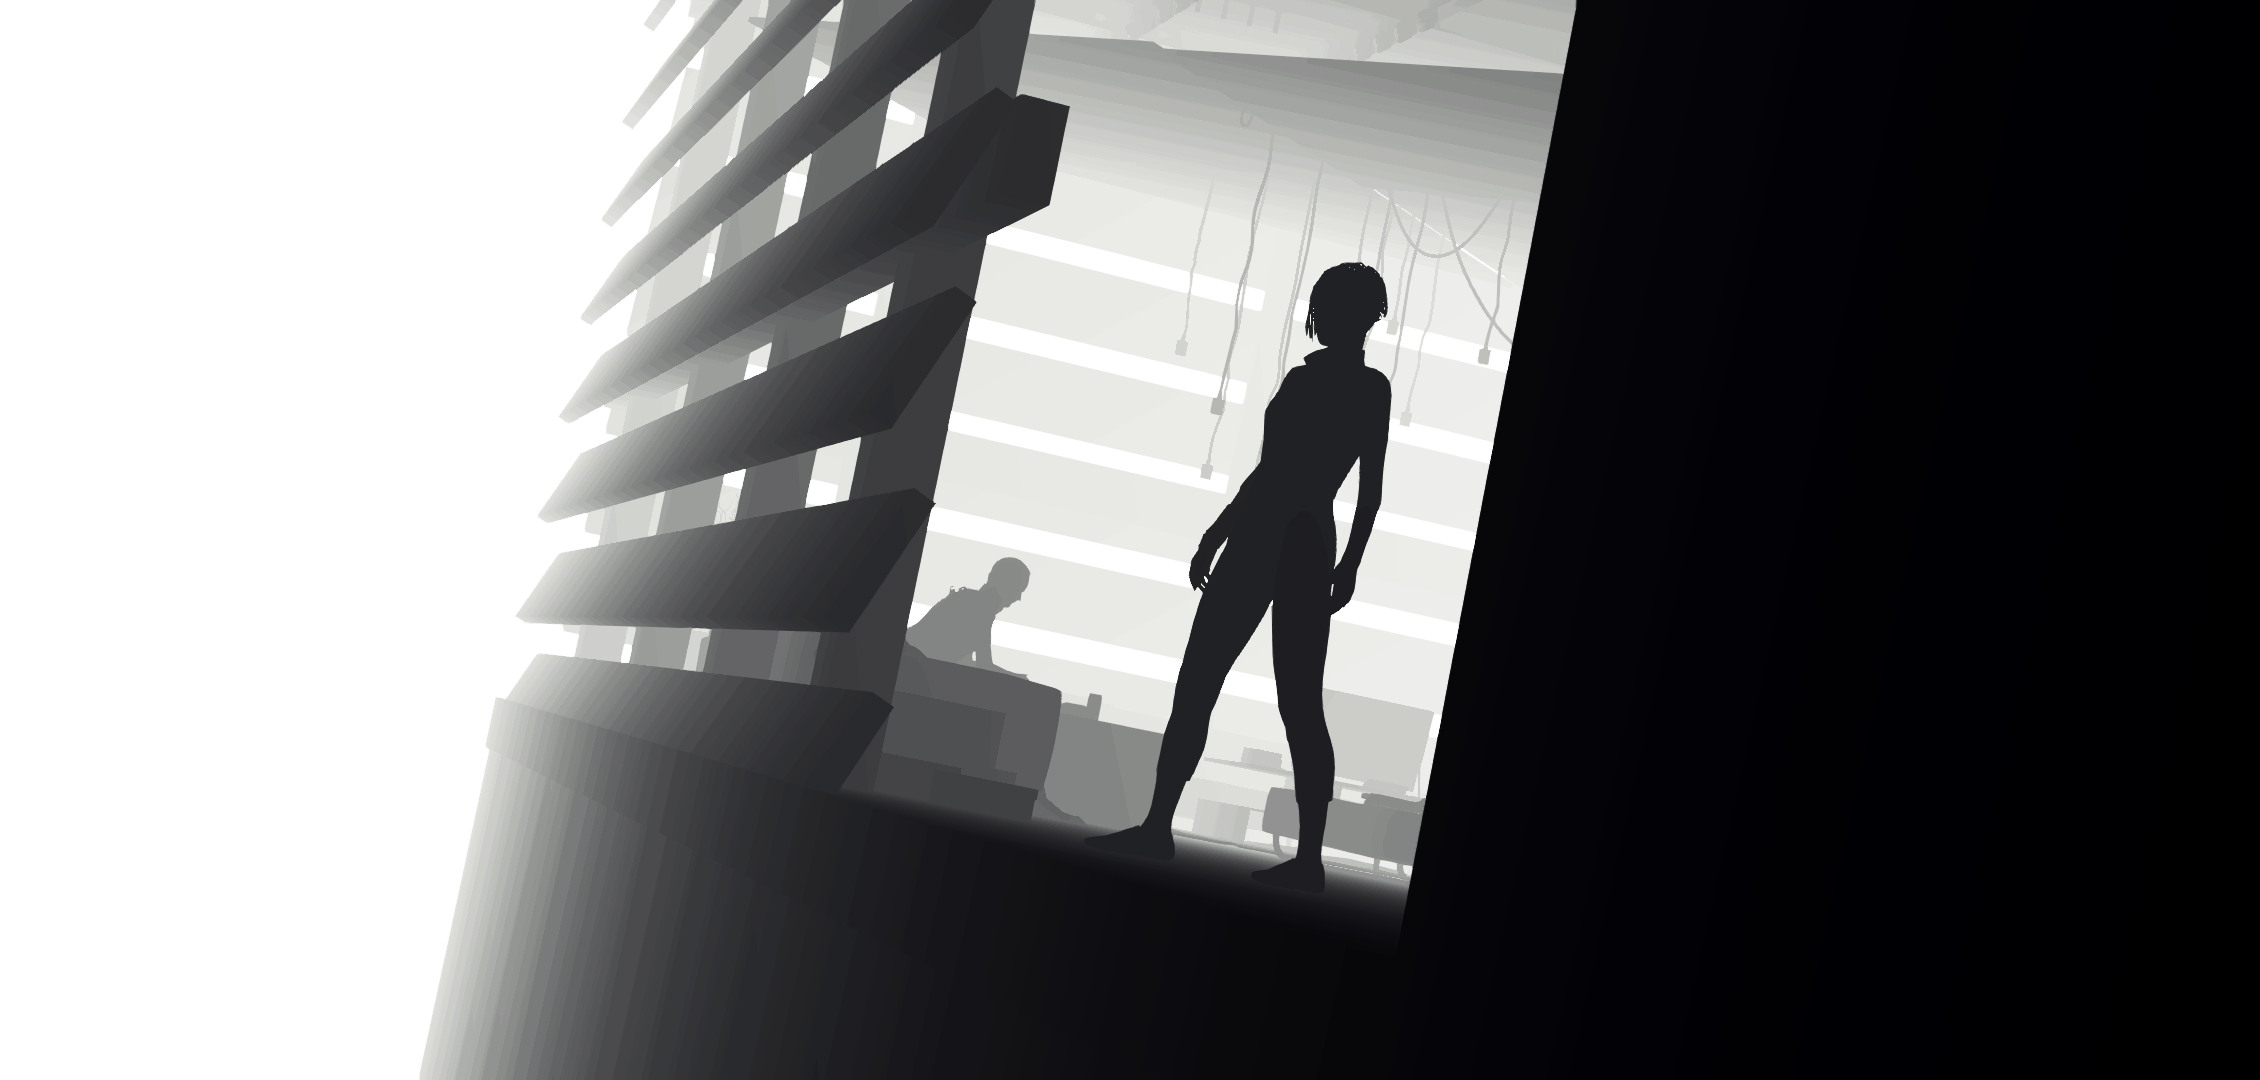
DisplayDepth: I absolutely love this one! If the game supports it you can set up a default key (which should be already locked on F12) and get a strong black/white contrast with some depth available. I also found this one very useful for some animation practice; for example I used a few static screenshots made with this shader to create these:

Note: If you notice the edges are not looking smooth and defined at all, that probably depends on how the list in your Pipeline file is set. I suggest you to try this new configuration in that case, I experienced that issue myself and with the new file you can see how good it looks now.
Shaders_by_Ganossa
MOTION_BLUR: It adds an intelligent soft blur to the background.
ADV_MOTION_BLUR: Same as above, just a bit more accurate and visible.
MOTION_FOCUS: This one is quite interesting, but could also result annoying. It adds an automatic smart movement to the camera for another cinematic look.
AMBIENT LIGHT: It creates a scene dependent light adding some dirt and lens effect on your screen.
TUNINGPALETTE: This one uses a specific combination for some additional color and it offers a lot of values you can alter to create a different atmosphere.
TILTSHIFT: I never really used this shader, but mostly because I wasn’t sure about its function. I recently found out Photoshop has an implemented plugin with the same name and what this thingy does is essentially adding some blur/depth of field in your scene. If you use it in ReShade you will notice the focus changes automatically according to your camera movement and you can change the amount of blur and such using its values.
Note: Useful for screenshots with your HUD hidden. Playing normally with Tiltshift activated will result in a blurry UI.
BLOOM: If you want more blur and get a dreamy look, this is definitely the shader for you!
LENSDIRT: Adds more dirt on your screen for a more ‘grungy’ result.
LENZFLARE: Just like the name suggests, this shader adds a realistic lens flare in the scene.
GODRAYS: If you want more sunbeams, there you go.
Shaders_by_JPulowski
OUTLINE: Nice one if you want to be more artistic and get a ‘lineart’ effect. Very tricky and the lines do not always look nice and thin… but if you set it up correctly you may actually obtain something pretty:
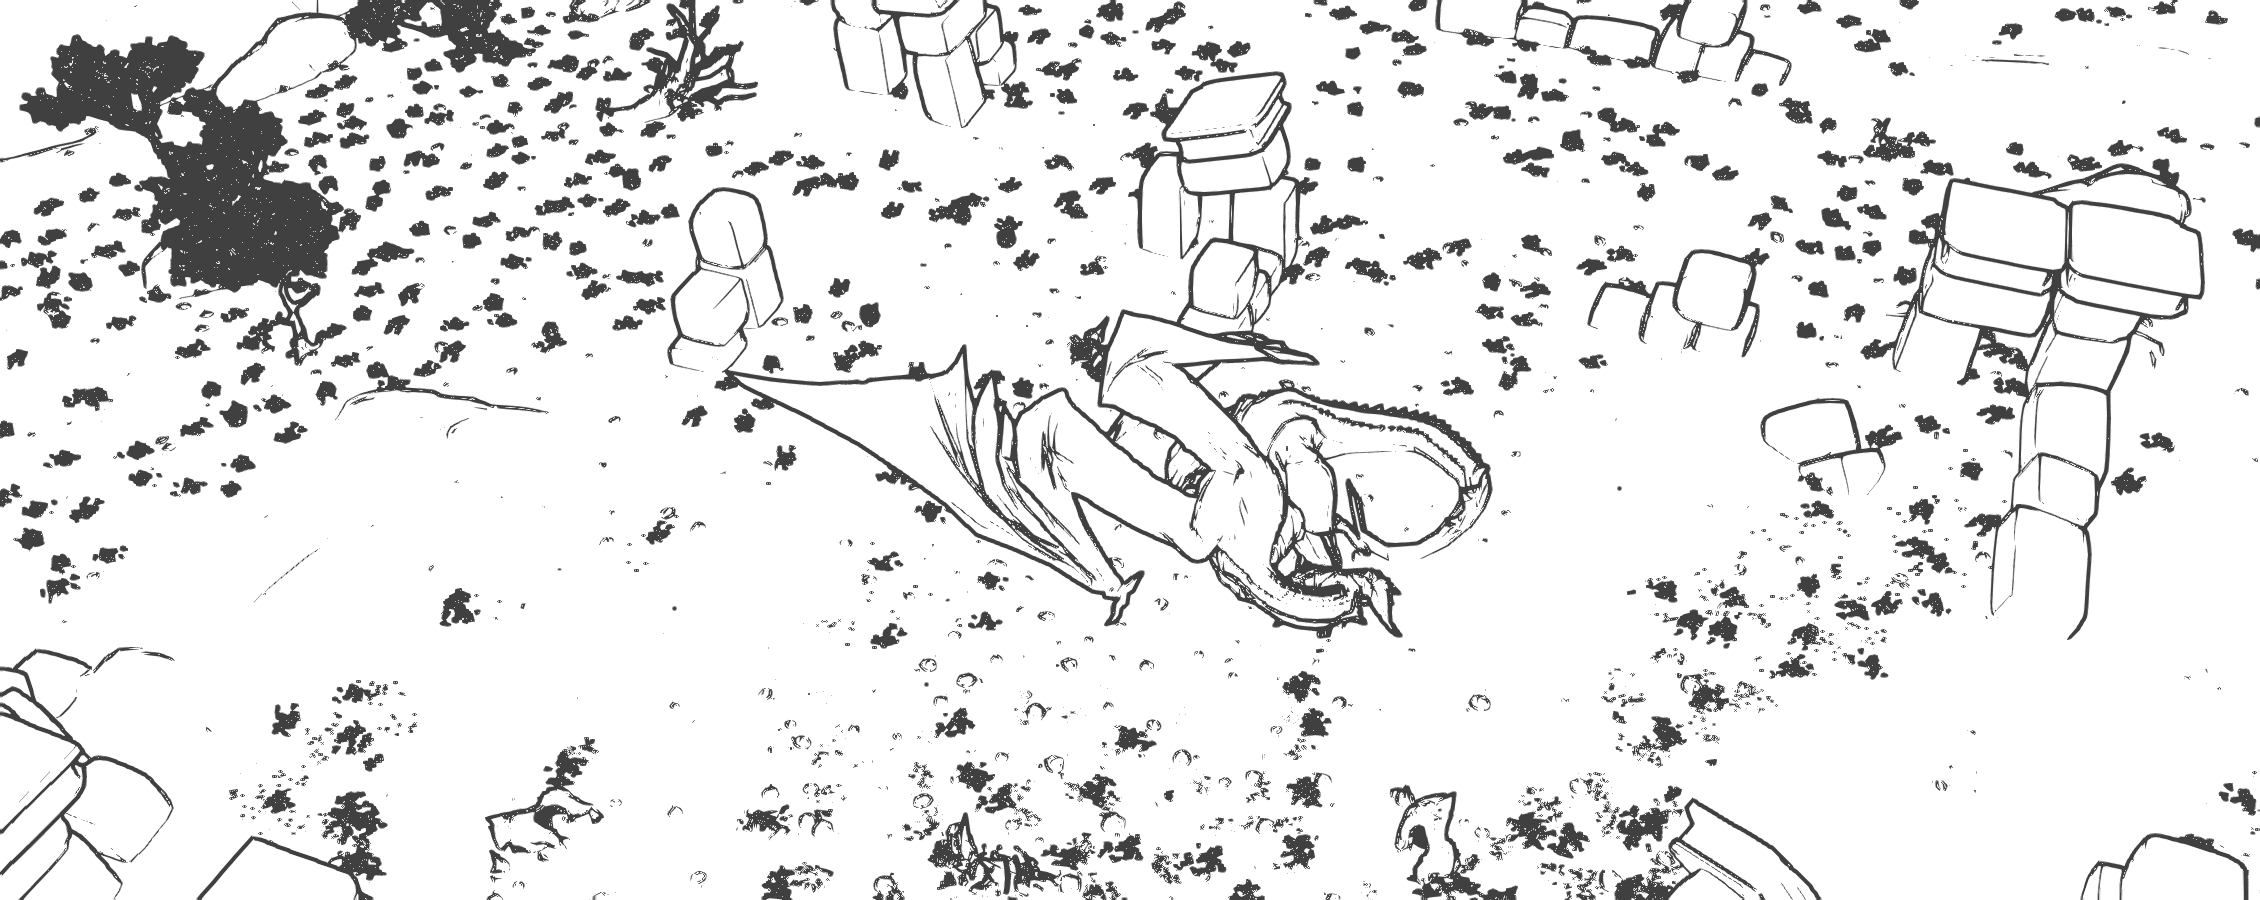
If you don’t know how to get a similar result and all your lines look sharp and thick, check this page.
Shaders_by_MartyMcFly
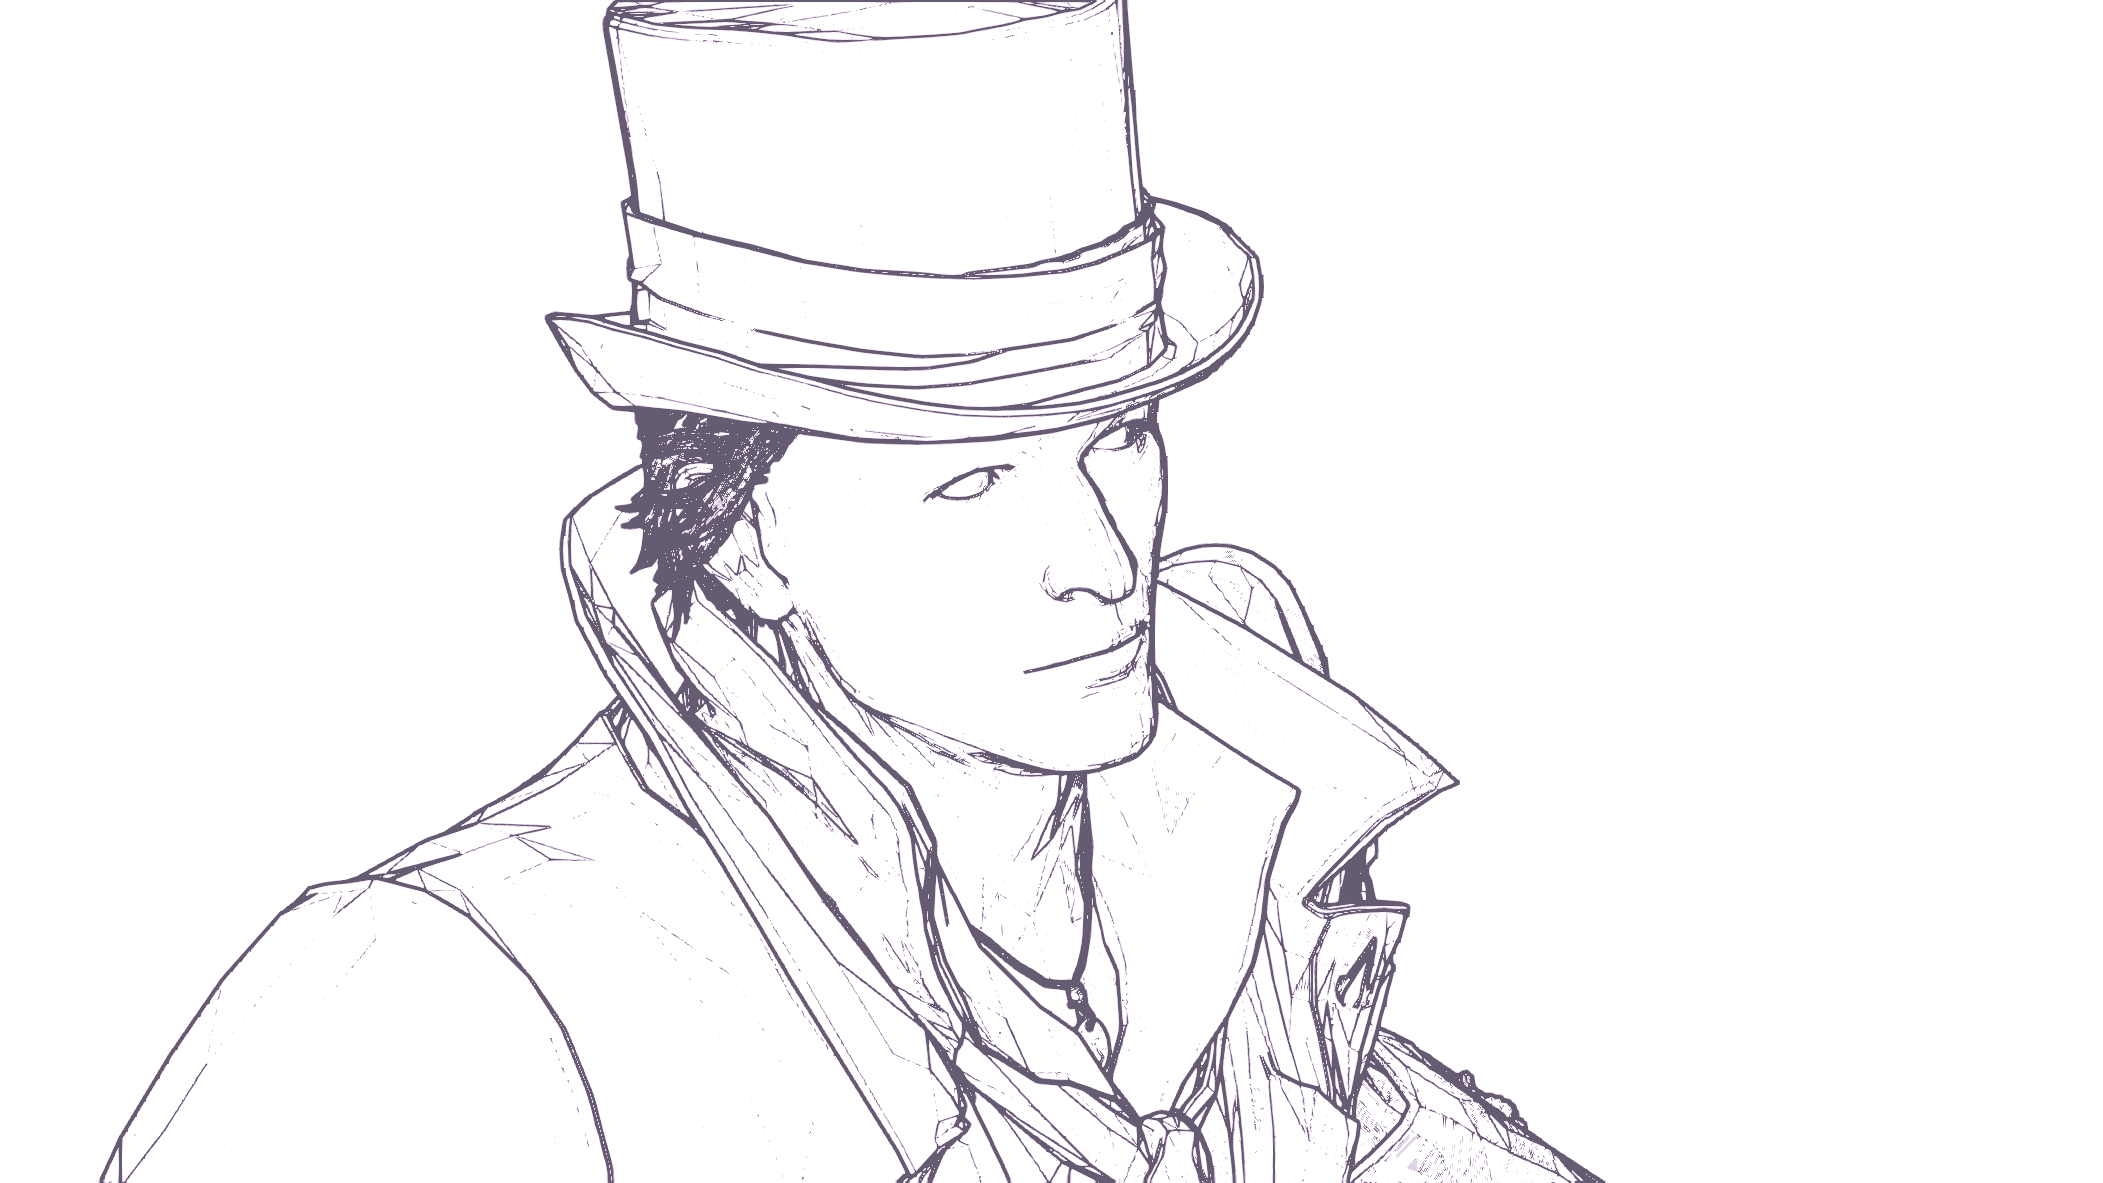
AMBIENTOCCLUSION: This may or may not look good depending on how the game is rendered and all. It should increase the overall shadows and create a more realistic feeling, but it doesn’t always work as it should. Still, you could combine this one with the Outline shader setting the AO_DEBUG option to 1. This way you will add some more depth to your ‘sketchy’ screenshots.
DEPTHOFFIELD: Well, you guys should know by now that I am a big DOF fan. It is very common also in photography and if supported properly it can really create some beautiful shots with the right focus. Careful with it though: it requires some specific settings in order to look good and not cover just some random spots, thus you should set it up just like the talented Otis did here.
Sadly this shader may act wonky with older games for some reason. While it seems to work nicely in all the recent titles I tried, with some 2012 installments the blur appears ‘broken’.
If you want to properly use this shader, however, keep reading because there are still a few modifications you are supposed to make in another .cfg file.
Examples:
TECHNICOLOR: I don’t think it’s different from the one in Ceejay’s document. Still, it’s useful if you want to play around with the colors some more.
COLORMOOD: Adds some tint to the dark colors. Change the values according to your preference.
COLORHUEFX: Another interesting shader. It only displays one color desaturating all the rest.
Example:
Shaders_by_Otis
DEPTHHAZE: It blurs and fogs a bit the far away scenery adding some more depth to it. It may also be required if you want to use the DisplayDepth.
MOUSEOVERLAY: This is the shader you have to use along with the DOF one. If you activate this also setting RESHADE_DEPTH_INPUT_IS_REVERSED and RESHADE_DEPTH_INPUT_IS_LOGARITHMIC to 1 in Global.cfg (ReShade > Profiles > Default), you can get a nice red dot in your game pressing the Pause key. If you move your mouse you can decide what will stay in focus and what will be hidden behind a certain amount of blur using the dot as guide, although this method works best if the whole game is paused and the camera doesn’t move with your mouse.
In order to take the shot press the Pause key again to hide the dot, or else it will appear in the final image as well.
ADAPTIVEFOG: This is a very nice option which can add some more volumetric/atmospheric effect. It generates a nice amount of fog all around whenever you press F8 and it seems to work perfectly even if you activate the DisplayDepth described above.
If you want to get the right values use this file as reference.
Examples:

These are more or less the settings I use and/or test from time to time according to the game and my needs.
To activate a shader just change the number next to it from 0 to 1 in Notepad, save the document and you’re ready to go and enjoy your new graphics. To turn them off, change the value back to 0.
Warning: The more effects you add, the heavier the game will become. I’d say don’t overdo it, only keep the effects you really like and try not to stress your computer more than necessary. If your FPS will be affected by the applied modifications it’s not really worth it, unless you only want to use the shaders for your screenshots.
You can deactivate ReShade without removing it pressing the Scroll Lock key on your keyboard, but if you want to delete ReShade and play vanilla again, remove the folder, dxgi.dll and ReShade.fx.
You can copy a configuration you like to another game, the appearance could change a bit depending on the rendered scenes.
Note: Not all the games out there actually support ReShade. The older ones can work with SweetFX, which offers some similar options but is very limited compared to its successor. Open the ReShade Setup.exe and click the Select Game button, from there just pick the main .exe and it will automatically add the files in its directory. You should see a new folder called SweetFX, open it and click on the SweetFX_settings.txt file to change the values from 0 to 1 again.
If you don’t want to spend too much time over the presets and prefer to add something already made by someone else, you can visit this page and download the ones you like carefully reading all the instructions provided by the authors. Alternatively you can also visit the Nexus modding site. Those are very useful if you are a beginner and want something ready for you to emulate and study the presets.
Other games like Skyrim use a ENB configuration instead of the standard ReShade. For more informations about this method, please check my previous article.


4 Comments
Mark
But how do we do this in Photoshop?
Nika
Hello Mark!
ReShade is not a Photoshop plugin if that’s what you’re asking. It is a mod for video games which alters the original graphics, improving the effects with tones, colors, interesting shaders etc. What you see in this post comes directly from the games and it’s not related to Photoshop at all.
Please feel free to comment again if you have any more question about it!
Anthony
Seems like some of the shaders like ‘COLORHUEFX’ & ‘COLORMOOD’ (by MartyMcFly), TUNINGPALETTE (by Ganossa), etc. are not being provided with Reshade 4 applications. Were they renamed or can I download them from somewhere else?
Nika
Hello Anthony!
Yes, I noticed some things have changed in ReShade 4 and I don’t think I’ve seen those shaders in the list anymore. However, there might be different variations for those, like COLORISOLATION for COLORHUEFX and other coloring filters that may work as COLORMOOD did. I am testing things around with the new version lately in most recent games, thus I will definitely make a new updated guide for it as well.
In the meantime you could download some shaders from Frans Bouma’s repository, they have been modified for a better result not long ago!