Shadowplay, OBS Studio and Plays TV for gameplay recording
You want to start a YouTube channel and upload your gameplays for the first time, but you don’t know how to properly record those on PC without losing quality or getting gigantic sizes that literally eat up your entire hard drive. The most used programs for gameplay recording are currently Nvidia Shadowplay, OBS Studio and Plays TV.
Let’s start saying that if you installed Fraps you probably already noticed it is not one of the best options out there. There are two very important reasons why you shouldn’t rely on such a program to record your videos, especially if what you’re seeking is a high quality for smooth and limpid gameplays.
A common issue related to Fraps is the overly heavy videos the program tends to make. Even with a few seconds you can get a +200 MB file, so think about making a 2 hours long clip instead: you will never be able to store that one without filling your space to the very last byte (unless you have a 2T HDD). Think about compressing that beast and the time you’d waste to still get a huge file in the end.
The second problem I noticed using this recorder is that no matter how smooth my game originally runs, Fraps will always ruin the performance with an ugly stuttering here and there most of the time. Dropped frames are a gamer’s nightmare and we certainly don’t want to bring those in our videos, right?
I highly suggest you to consider different options, especially because Fraps is not exactly a free program and it’s quite outdated by now. If you’re thinking to buy a license for the extended and complete version I’d honestly try other free (and updated) applications first.
Nvidia Shadowplay
If you own a Nvidia card and have GeForce Experience installed you probably don’t know that you have a nice video recorder implemented. This means you don’t even need to download and install any other additional program, Shadowplay allows you to make high quality videos without any dropped frames and you can also stream from it directly and share your progress in real time.
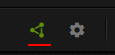
First of all you have to enable the feature in GeForce Experience by clicking the “triangle” icon next to your profile picture.
After that you should see a new window with these options:
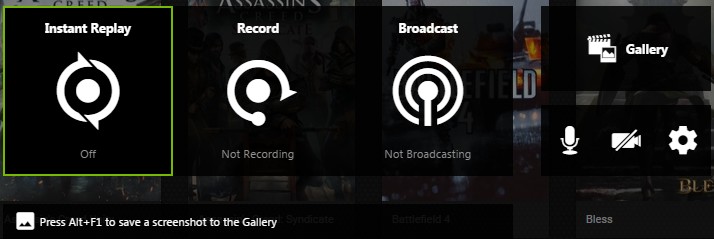
Click on the gear to check your settings and eventually set up your own shortcuts. By default, Alt+F9 will let you start/stop a manual recording.
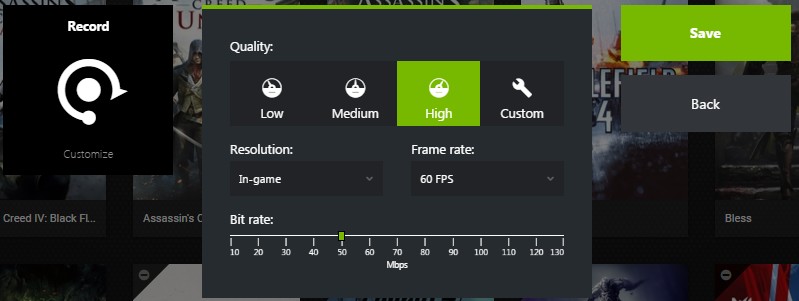
If you select the Record button and go to Customize you can pick your favorite resolution and general quality.
Under Settings (gear) > Recordings you can see or change your path for the finished videos and they will automatically save in that directory once you’re done with the capture.
Keep in mind that your video size will change according to your quality and resolution settings. If you want to record in 4K expect some big clips nonetheless, althouth they won’t be as heavy as the ones recorded with Fraps.
Open Broadcaster Software is generally used to stream on Twitch, but it also offers a simple recording feature while playing offline. Sadly this program may give you some issues with the Game Capture, if you experienced that yourself let’s see what we can do to make it work.
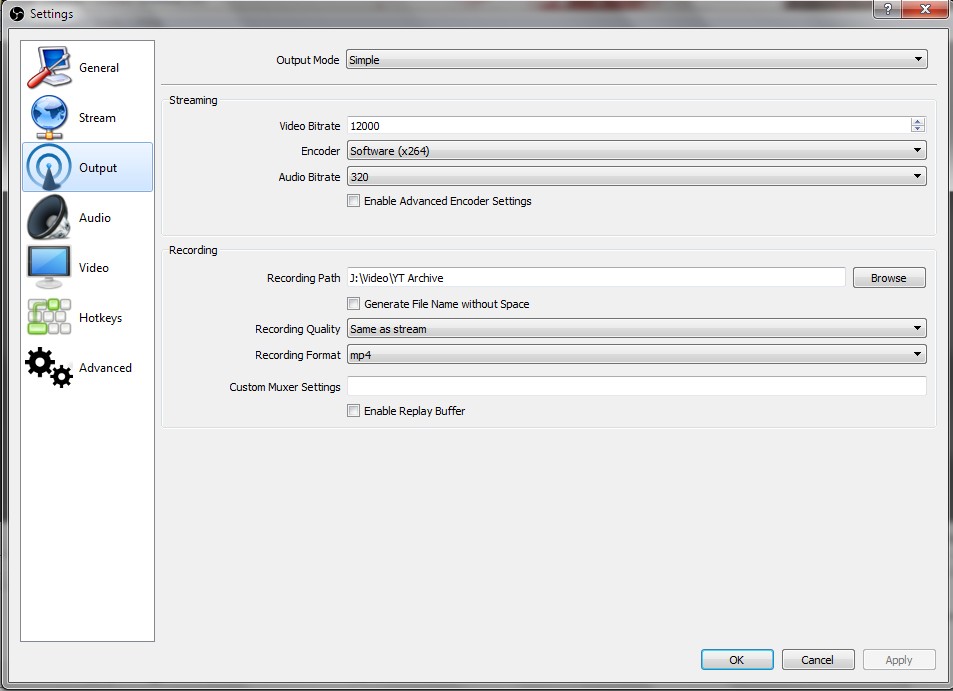
Under File > Settings you can modify all the needed options for a proper encoding and overall quality. This is how I set up my Output panel.
Be sure to also open the Hotkeys path and choose a combination for the capture under Start/Stop Recording.
Now you have to tell OBS what you intend to capture and how. Set up a new scene under Scenes right-clicking in the blank space and select Add, type a name and save. Under Sources you need to create a capturing method, right-click again > Add.
Since we want to record our gameplays you should select the Game Capture and then Capture specific window or Capture any fullscreen application from the window (should appear automatically whenever you add it). If you are playing in windowed mode OBS will ask you exactly which window you want it to recognize. Select the drop-down menu next to Window and you should be able to find the game in the available list (must be running in the background), choose that and confirm your modifications.
Done! Now you’re ready to start recording, yay!
Oh wait…
Are you telling me you can’t see the game in OBS at all but keep getting a black screen instead? Ouch, I guess it was inevitable uh.
The first thing you have to check is the way you’re loading OBS Studio. If it’s not opening with administrator rights I’d fix that (right-click > Properties > Compatibility > Load this program as Administrator) and try again, if you’re lucky everything will work fine and you won’t have to deal with a boring black screen ever again.
If that didn’t work see if you are using the correct version for your system. OBS can be a 32 or 64 bit application, using the one not compatible with your computer will result in unwanted problems for sure.
You will also see that a few games will have no troubles with the Game Capture, while the most recent ones do not want to appear at all in OBS. Another thing you can do (and that actually worked for me) is completely disable any active video recorder in the background, Shadowplay first and foremost. Even if you don’t use it you probably still have it active, open GeForce Experience, go to Settings (top gear) > General > Share. Turn it off completely and try opening OBS one more time.
The broadcaster does not properly work with other recording options running on your computer, even if you’re not directly capturing in that specific moment. If Shadowplay is on, any game compatible with it will automatically recognize the feature at each load and that will create a sort of conflict with OBS.
The reason why this program is quite popular for streaming and recording gameplays is the possibility of adding overlays and more creative stuff into your screen. This is very useful if you don’t want a standard, boring gameplay. For more informations about this and how to stream through OBS check my old article here (note: it’s mostly related to the classic version of OBS, but the settings are quite similar. Also, a few streamers found the newest version problematic and prefer to use the classic one to stream).
This program is really nice especially if you want to be part of a gaming community and directly share your experience with other people in a completely standalone platform.
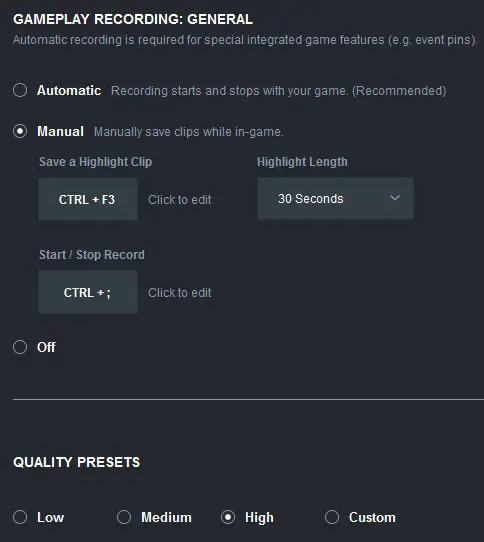
If you don’t want to capture your game as soon as it loads without doing anything choose the manual recording instead (Gear > Video).
You can also create a highlight recording to store the best moments from your experience and see what other players think of it.
As you can see, Plays TV is quite easy to use and it works with all the newest games.
Finalize your video
“How can I compress a video? It’s still a bit heavy and I’d like to make it smaller without affecting the quality.”
VirtualDub is a good option for this, not only it’s free but I always felt satisfied with the way it makes the video size smaller while still keeping a smooth image. You can find a detailed guide for that here.
“I’d like to make a professional montage instead of loading my recording as it is. What do you suggest?”
Many people nowadays use Sony Vegas, Adobe Premier or iMovie on Mac and you can also get After Effects for additional tricks. Keep in mind though that none of these programs is free and if you are a novice user you should probably try out Vegas first.
If you’re thinking about Movie Maker because you already have it installed and it’s the only thing you managed to use in the years… just don’t 😛 it is not recommended for high quality clips.
Is there any other video recorder that you’d like to suggest? Are you still having issues with OBS Studio and require more assistance on that front? Feel free to let me know in a comment below.

