Graphics Settings on PC Games
We usually expect two things while loading a new game on our machine; quality and performance. A well built computer offers wonderful graphics and opportunities, but sometimes even with a powerful GPU, a good processor and a decent amount of RAM we may get a poor result setting everything to Ultra. Why? In this article I’m going to show you how Graphics Settings on PC Games work.
If you’re not sure about your computer’s capacity you can check the requirements for any available game on this site, or read this little guide if you plan to build your own PC.
Let’s take a look on the common settings:
• Models/meshes: Overall quality for characters and environments.
• Textures: Images ‘painted’ on every single virtual person or object. The maps usually are subdivided in Diffuse (surface color), Normal (blue channel defining details such as skin pores, clothes, etc without adding more polygons), Specular (surface’s shininess and highlight color) and Ambient Occlusion (white images with realistic shadows to fake an ambient lighting).
• Effects: Volumetric atmosphere, fog, rain/snow, foliage, etc.
• Shadow quality: It defines how detailed the shadows will be.
• Ambient Occlusion: Rendering technique used to calculate how exposed each point in a scene is to ambient lighting.
• Anti-aliasing (AA): Technique which gets rid of the jagged pixels (or ‘staircase effect’) on the image creating a smoother and more detailed look.
• V-Sync (Vertical synchronization): Option available in most systems. The video card is prevented from doing anything visible to the display memory until after the monitor finishes its current refresh cycle (avoiding the so called screen tearing).
• Anisotropic Filtering: Method of enhancing the textures’ quality at oblique viewing angles.
• Bloom: It basically blurs the image in bright areas for a more cinematic look.
“I have a powerful PC, so if I set everything to Ultra I will get a wonderful detail with a good performance!”
Yes and no.
Just because your rig meets or exceeds the recommended requirements you won’t always be able to run a game smoothly with Ultra graphics. It generally depends on the way an installment is optimized, one game will load perfectly with all the settings on the maximum, another may run like a snail due to the heavy effects applied. My GTX 970 with 4GB is perfect for what I want to achieve right now, but newer games literally absorb all its memory and I have to lower a few settings here and there in order to play without getting wrinkles.
“I have a Nvidia card. I can use GeForce Experience to optimize my games automatically.”
That is true, but in my opinion not always recommended. I never really use the Nvidia optimization because it tends to deactivate the anti-aliasing and this filter is 100% needed if you don’t want your game to have sharp edges. It also lowers some effects that I could keep as they are with no troubles.
Setting the environments to High from Ultra will not change your image quality at all and it will make the whole performance way better. Shadows have a huge impact on the gameplay as well.
“How should I set my anti-aliasing?”
The fastest filter available is the FXAA (from Nvidia). It smoothes all the edges without affecting your performance too much, but it has a downside; once applied some of the textures could appear a bit too ‘soft’ and lose their original quality.
The MSAA is very similar to the FXAA and it uses directly your GPU’s hardware cutting down the required processing power by calculating textures only once per pixel.
The TXAA (also from Nvidia) is a film-style technique (used in CG films) recently introduced in games and it visibly gets rid of our jagged pixels. The power required for this filter is obviously very high, though.
The SSAA (or FSAA) works quite well on photorealistic scenes, but it has a great hardware cost and for this reason you may not find the option in newer games.
If you are using an AMD card and cannot find some of the above filters, you can still see or download additional options and even get a better result. The SMAA for example is really efficient; it basically works just like the MSAA but it reduces the jagged pixels without blurring the objects.
For a more advanced and technical explanation you can check this video.
“I tried all the anti-aliasing options available but nothing seems to work properly. I still get some jagged pixels and flickering edges here and there.”
This is a common issue, actually.
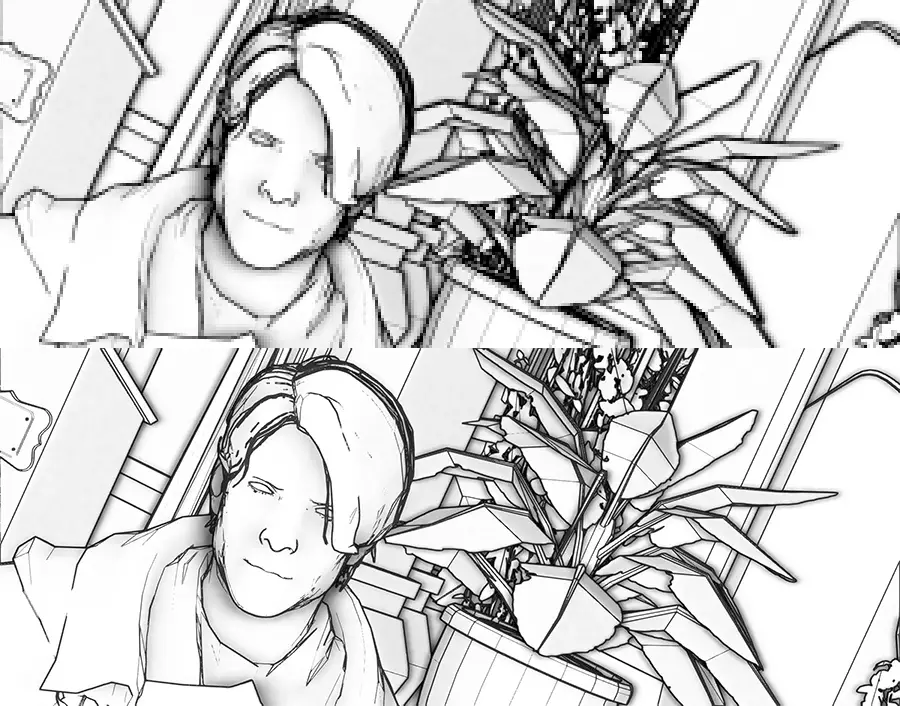
First of all, if you are using a ReShade configuration you can activate the SMAA and/or the FXAA from the Presets if these are not in your settings already. It helps me quite a lot with the outlines shader, for example:
If you can add/alter the AA settings in your Nvidia or ATI Control Panel you should try those options too and see if it looks different. Even so, the flickering issue will probably remain and the jagged pixels will still appear in some games.
Your native resolution could be the main issue if it’s not high enough. Playing in 4k usually helps increasing the quality, but you either need a HD monitor with said resolution or use GeDoSaTo where supported to make everything bigger. The higher our resolution is the more pixels and details will be added to the scene, getting rid of that annoying jaggy effect and smoothing the lines.
“How does AO works?”
Just like the anti-aliasing, Ambient Occlusion could appear with different filters in your settings.
SSAO has been introduced in 2007 by the Crysis® video game, developed by Crytek and published by Electronic Arts. Although it fakes shadows and ambient lighting it’s currently not the best solution due to the lack of accuracy.
SSDO is an upgrade for the SSAO created in 2009 and it renders directional shadows and indirect color bleeding around the objects.
HBAO+ (Nvidia) uses a physically-based algorithm that approximates an integral with depth buffer sampling, the upgrade enables HBAO to generate higher-quality SSAO whilst increasing the definition, quality, and visibility of the AO shadowing.
HDAO is a high definition filter introduced by AMD with DirectX 11 and requires a powerful hardware in order to work without performance costs.
Again it depends on how you like it and how the game runs with these settings applied, it’s still very difficult to re-create a realistic ambient lighting with the current hardware limitation.
Note: Not all the games have the same options in the Video section, thus playing around with the above settings could be impossible if they are not included.
“If I increase the in-game resolution all of a sudden everything becomes terribly slow and unplayable. Is that normal?”
Totally normal, especially if your native resolution is way smaller than the one you set. It also depends on your monitor, GPU and how many resolutions the installed graphics card can handle.
“My game stutters quite a lot even lowering all the settings.”
Chances are the V-Sync option is set to ON. It’s mostly used to improve the video quality and remove that annoying tearing effect you get whenever your camera moves around, but once it’s applied the overall frame rate is equal to your monitor’s refresh rate (e.g 60fps for 60Hz). When the V-Sync is enabled and the frame rate drops below the monitor’s refresh rate, the frame rate fluctuates wildly, causing visible stuttering.
Now the question arises: How can we avoid the stuttering AND screen tearing? If you have a Nvidia card you can set the Vertical sync on Adaptive. To do so simply right-click on your Desktop, open the Nvidia Control Panel and then click on Manage 3D Settings. If you have an ATI AMD Radeon you can do the same thing by downloading Radeon Pro and activate its Dynamic V-Sync.
If you have any question regarding this topic feel free to leave me a comment! 🙂

